In addition to the built-in reports that are standard in AscentialTest, the product also provides the ability to design and generate custom reports.
The first step is to building a custom report is to determine whether the data required for the custom report is already available in the standard output files. By default, AscentialTest generates the following files to report on test results:
- TestSet.xml
- An Output folder for each tests containing the following files:
- Output.xml
- Result.xml
- Run.xml
- Test.xml
- .png files for screen, baseline, actual and diff images
- Test.z
Refer to the appendix for an example of each file. Since these files contain all of the pertinent information for each test along with its results, most of the data required for custom reports will already be included.
Custom Data Record
If the custom report requires data that is not already available in the standard output files, a custom data record is defined with a member for each item to be added to output.xml. The record displayed below is only an example. The user can include any number of fields of any type:
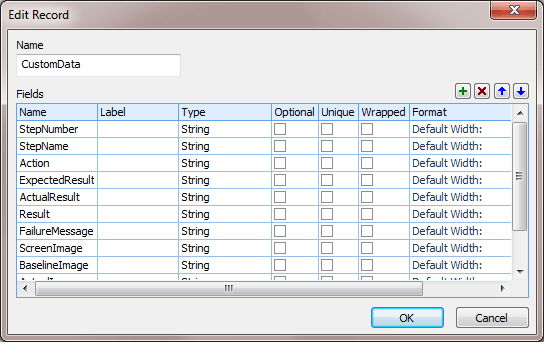
This approach allows the user to decide what custom data is to be included in the custom report. The example above includes the columns to be displayed in the custom report for data that is not already available from other exported xml. A separate record can be created for each custom report as required by the user.
Populating the Custom Data Record
The members of the custom data record are assigned values during the execution of the test. The image below shows how some of the values are assigned by the test designer in the test itself, while others are captured from the target application at runtime:
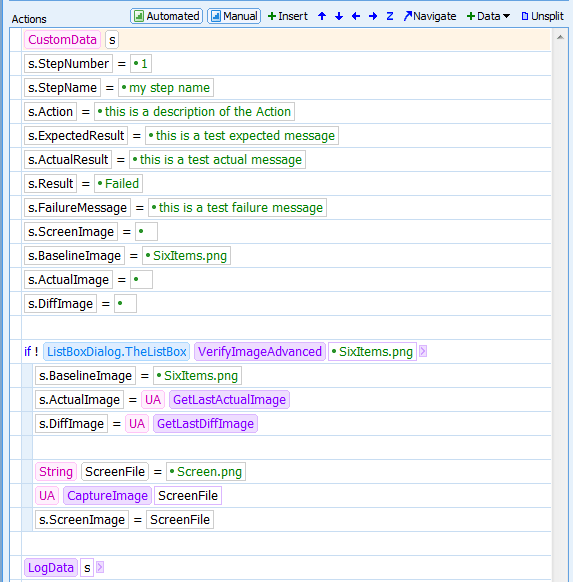
Notice that the step concludes with a call to ‘LogData’ with the custom data record now fully populated. Adding the ‘LogData’ call is required to get the custom data into the resulting output.xml. It also provides a way for the user to view the data by clicking on the LogData icon  in the test results output:

Test Set Export
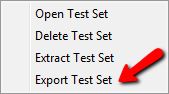
Test Set Export is provided for the report designer to generate a set of output xml in order to design the custom report. After the user runs a test or set of tests from the Test Set, the results can be exported using the ‘Export Test Set’ menu item from the Test Sets context menu in the Project Explorer.
The menu item invokes the ‘Select Folder for Test Export’:
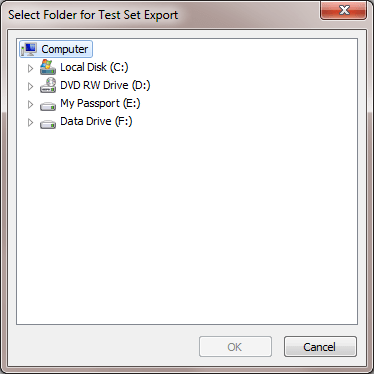
The user selects a folder to store the export package. The Test Set export package includes all the files listed above in the Introduction section.
It is expected that the user will create a program to convert the generated xml into a formatted report of the user’s design. The Test Set Export is not required once the report has been designed.
Custom report package
The user is responsible for designing the format and presentation of the resulting report. The user places a batch or other executable file in the C:\Users\User\AppData\Local\Zeenyx\AscentialTest\Reports folder. The name of the report displayed in the ‘Generate Custom Reports’ dialog (see below) is derived from that file name. Any other files necessary to transform the output xml and other inputs into the custom report must be stored in a folder other than the ‘Reports’ folder. Do not place those files in the ‘Reports’ folder because they will then display in the ‘Generate Custom Report’ dialog as additional reports.
Executing a Custom Report
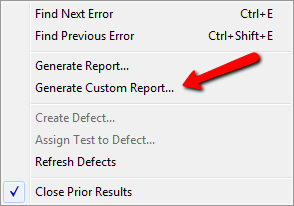
To execute a custom report, select ‘Generate Custom Report’ from the Test Set ‘Result’ menu:
The ‘Generate Custom Report’ dialog displays:
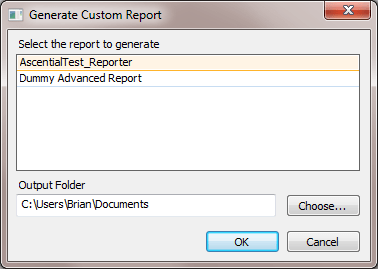
The user then selects a report from the list of reports and inputs the name of the output folder where the report will be stored. When the user clicks ‘OK’:
- AscentialTest generates a set of xml based on the current state of the Test Set in a temporary folder. The location of that temporary folder is: C:\Users\{UserName}\AppData\Local\Temp\AscentialTest\{Name of Test Set}\.
- AscentialTest calls the batch or executable file that the user has placed in the AscentialTest AppData\Reports folder. It passes two parameters:
- The location of the output xml files as a string.
- The location of the report output folder as specified by the user in the ‘Generate Custom Report’ dialog as a string.
It is that user defined action that will generate the custom report. The user defined action will most likely be comprised of xslt to convert the output xml into html. We recommend that the batch or executable file invoke the browser and display the report.
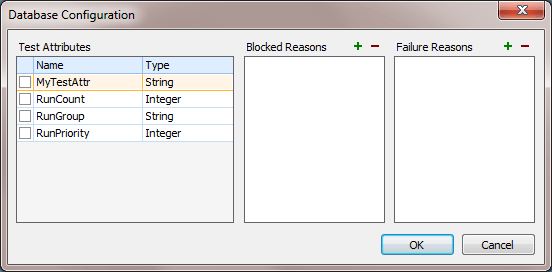
Attributes
Attributes are accessible for report generation through the file ‘test.xml’ which is part of the exported package. Any attributes that will be used in custom reports must be added to the results database through the ‘Database Configuration’ dialog before the Test Set is created:
If you have any questions about building custom reports or would like example source code, please contact Zeenyx Support at [email protected] for assistance.
Appendix
TestSet.xml:
<?xml version=”1.0″ encoding=”UTF-8″?>
<TestSet>
<Name>Report Demo</Name>
<Entity Kind=”Plan” Name=”TestReportsPlan”>
<Entity Kind=”Node” Name=”Test1″>
<Test>
<TestKind>Automated</TestKind>
<RunState>Run</RunState>
<TestStatus>Failed</TestStatus>
<StartDateTime>3/21/2018 9:36:09 PM</StartDateTime>
<FinishDateTime>3/21/2018 9:36:10 PM</FinishDateTime>
<ComputerName>BRIAN-PC</ComputerName>
<UserName>Brian</UserName>
<ResultCode>Failed</ResultCode>
</Test>
<OutputDir>Output1</OutputDir>
</Entity>
<Entity Kind=”Node” Name=”Test2″>
<Test>
<TestKind>Automated</TestKind>
<RunState>Run</RunState>
<TestStatus>Failed</TestStatus>
<StartDateTime>3/21/2018 9:36:10 PM</StartDateTime>
<FinishDateTime>3/21/2018 9:36:11 PM</FinishDateTime>
<ComputerName>BRIAN-PC</ComputerName>
<UserName>Brian</UserName>
<ResultCode>Failed</ResultCode>
</Test>
<OutputDir>Output2</OutputDir>
</Entity>
</Entity>
</TestSet>
Output.xml:
<?xml version=”1.0″ encoding=”UTF-8″?>
<Output>
<Line Type=”Print” Date=”2018-03-21″ Time=”21:36:09.713″>F:\Reports\AscentialReport</Line>
<Line Type=”Print” Time=”21:36:09.714″>StepsPerformed – in the first step</Line>
<Line Type=”Print” Time=”21:36:09.714″>ExpectedOutputfirst step should be performed</Line>
<Line Type=”Print” Time=”21:36:09.716″>SuccessMessage – In the first step actions</Line>
<Line Type=”Data” Time=”21:36:09.716″>
<Type Name=”ReportSteps” Class=”Record”>
<Field Name=”StepNumber” Type=”String”/>
<Field Name=”ActionsPerformed” Type=”String”/>
<Field Name=”ExpectedResult” Type=”String”/>
<Field Name=”StepStatus” Type=”String”/>
<Field Name=”ActualResults” Type=”String”/>
<Field Name=”DeskTopScreenShot” Type=”String”/>
<Field Name=”DiffImage” Type=”String”/>
<Field Name=”ActualImage” Type=”String”/>
<Field Name=”BaselineImage” Type=”String”/>
<Field Name=”ExecutedTime” Type=”String”/>
</Type>
<Data Name=”ReportSteps” Type=”ReportSteps”>
<Data Name=”StepNumber”>2</Data>
<Data Name=”ActionsPerformed”>in the first step</Data>
<Data Name=”ExpectedResult”>first step should be performed</Data>
<Data Name=”StepStatus”>Pass</Data>
<Data Name=”ActualResults”>In the first step actions</Data>
<Data Name=”DeskTopScreenShot”></Data>
<Data Name=”DiffImage”></Data>
<Data Name=”ActualImage”></Data>
<Data Name=”BaselineImage”></Data>
<Data Name=”ExecutedTime”>2018-03-21 21:36:09</Data>
</Data>
</Line>
<Line Type=”Trace” Time=”21:36:09.716″>ZeenyxHome.SetActive ()</Line>
<Line Type=”Trace” Time=”21:36:10.050″>ZeenyxHome.VerifyImageAdvanced ("ImageWithScroller.png", "", 600, null)</Line>
<Line Type=”Error” Time=”21:36:10.527″>Exception: Expected and actual images are different sizes</Line>
<Line Type=”CallStack”>Occurred in AppObject.VerifyImageAdvanced</Line>
<Line Type=”CallStack” File=”Functions.z” Line=”78″>Called from VerifyImageOutput on line 79 of Functions.z</Line>
<Line Type=”CallStack” File=”Steps.z” Line=”28″>Called from StepImageCompare.Main on line 29 of Steps.z</Line>
<Line Type=”CallStack” File=”Tests.z” Line=”5″>Called from Test1.Main on line 6 of Tests.z</Line>
</Output>
Result.xml:
<?xml version=”1.0″ encoding=”UTF-8″?>
<Result>
<Computer>Brian-pc</Computer>
<User>Brian</User>
<Started>2018-03-21 21:36:09</Started>
<Finished>2018-03-21 21:36:10</Finished>
<Status>Failed</Status>
</Result>
Run.xml:
<Run>
<RunDate>2018-03-21</RunDate>
<RunComputer>Brian-pc</RunComputer>
<RunNumber>8</RunNumber>
<RunEntity>TestReportsPlan</RunEntity>
<TestNumber>1</TestNumber>
</Run>
Test.xml:
<Project GUID=”DC336332461B14640CA1B5997B5DAE7F”>
<Name>ReportingProject</Name>
<Types CRC=”8C6B2FFE”>
<Enum Name=”WebBrowserType” IsZee=”true”>
<Value Name=”InternetExplorer” Value=”1″/>
<Value Name=”Firefox” Value=”2″/>
<Value Name=”Chrome” Value=”3″/>
</Enum>
</Types>
<Data>
<BrowserType>InternetExplorer</BrowserType>
<ReportLocation>F:\Reports\AscentialReport</ReportLocation>
<StartURL>https://www.zeenyx.com</StartURL>
</Data>
<Settings>
<DataStorePath>Project\DataStore</DataStorePath>
</Settings>
<DataStore/>
<Declare>
<Attributes>
<Attribute Name=”RunCount” Type=”Integer” Optional=”true”/>
<Attribute Name=”RunGroup” Type=”String” Optional=”true”/>
<Attribute Name=”RunPriority” Type=”Integer” Optional=”true”/>
<Attribute Name=”Testcasename” Type=”String” Optional=”true”/>
<Attribute Name=”Category” Type=”String” Optional=”true”/>
</Attributes>
<Variables>
<Variable Name=”ReportLocation” Type=”String”/>
<Variable Name=”BrowserType” Type=”WebBrowserType”/>
<Variable Name=”StartURL” Type=”String”/>
</Variables>
</Declare>
<Plans>
<Plan GUID=”C7F09E7D4FD9AB97FD186FA3FFD38215″>
<Name>TestReportsPlan</Name>
<Nodes>
<Node GUID=”263DC1494522D683F969F0AEBE877259″>
<Name>Test1</Name>
<Test Name=”Test1″/>
</Node>
</Nodes>
</Plan>
</Plans>
</Project>
Test.z:
_Test_()
Test1 test
test.Run()


 Brian has been working in the field of test automation for more than 30 years. Brian began as a QA Engineer using the testing tools available in the early 1980’s. He joined Segue Software in its infancy and served as the EVP of R&D during that company’s golden years. Brian formed Star Quality, a consulting firm specializing in test automation in the late 90s. After 12 years of experience in the trenches, he’s excited to be building the next generation testing tool that will increase the productivity and and effectiveness of test and development teams.
 Dave is a pioneer in the field of automated testing. Dave developed ATF, one of the first automation tools, more than 20 yeas ago. He was a founder and Chief Architect of Segue Software, Inc., the original creators of QA Partner/SilkTest. Dave believes that no testing tool can be easy to use without a solid foundation. That’s why he is committed to providing AscentialTest’s universal agent with the most powerful object recognition engine in the industry.