Introduction
AscentialTest users often ask how to define App Objects for tabbed windows. While there are several possible approaches, this paper presents what Zeenyx Support considers the best practice.
Exploring the Alternatives:
Tabbed windows are often implemented within a top level window like a Dialogbox or MDIChild.
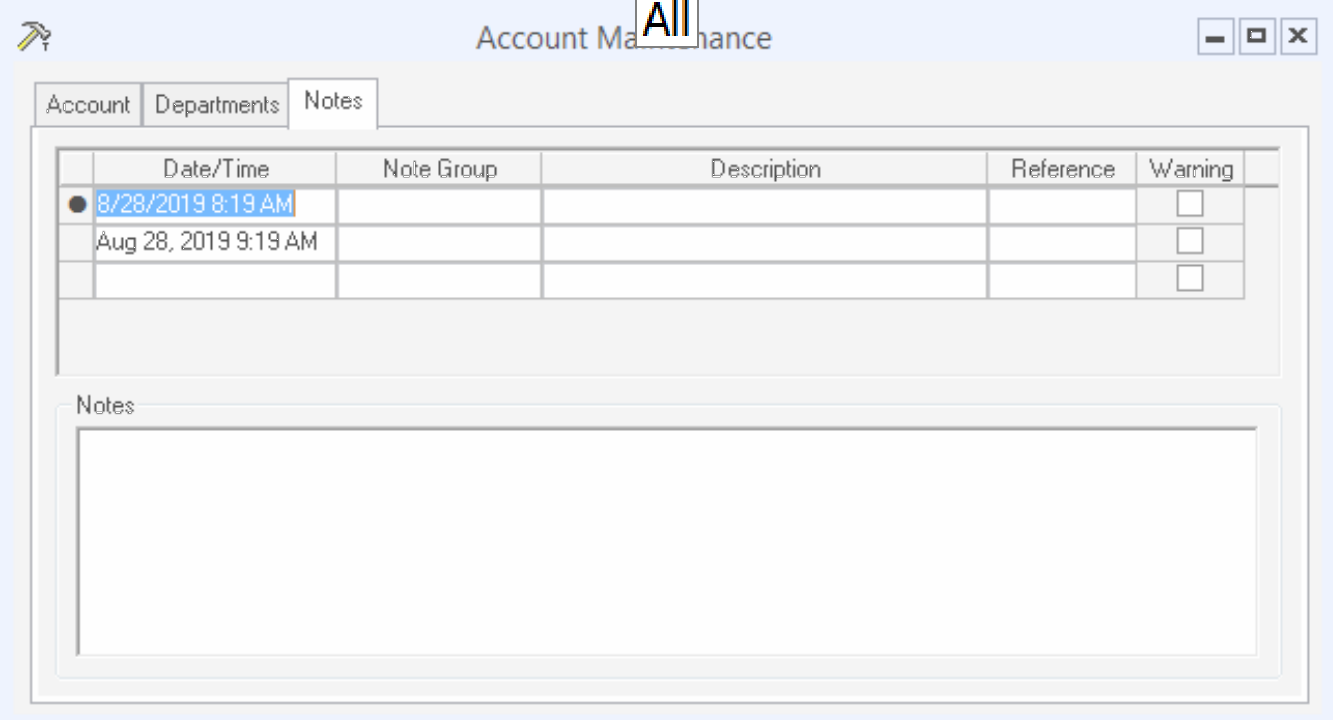
Here is an example. This MDIChild has three tabbed windows: Account, Departments and Notes:
There are three general approaches that we’ve seen our customers use to define tabbed windows:
- Define a single top level App Object with the elements of all the tabs
- Define each tabbed window as a top level App Object
- Define the tabbed windows and their contained elements within a single top level App Object
The first option is clearly not a good choice because AscentialTest will not be able to determine whether the target tab window is the active tab. Synchronization issues are likely to result.
The second option is reasonable enough but the relationship between the tabbed windows may not be as clear and there is the potential to have many more top level window definitions.
Our preference is to define a single top level AppObject and then nest the tabbed windows beneath it, along with their respective elements. The class of the tabbed window will vary depending on the implementation. Examples are provided below.
Defining the Top Level Window:
Rather than using the standard approach of dragging and dropping the ‘All’ button to define the top level window and its contents, when defining tabbed windows, it is better to drag over the top level window element from the Elements panel.

In the example above, the MDIChild is dragged to the App Objects panel to define the top level window. In other cases, the top level window might be of the class ‘Dialogbox’ or ‘Window’.
Defining the Tabs:
In most cases there will be an element of the class ‘TabGroup’ displayed in the Elements panel:

That TabGroup can be dragged from either the Elements panel or the Snapshot Image. In either case an AppObject will be defined for the TabGroup and the set of tabs:
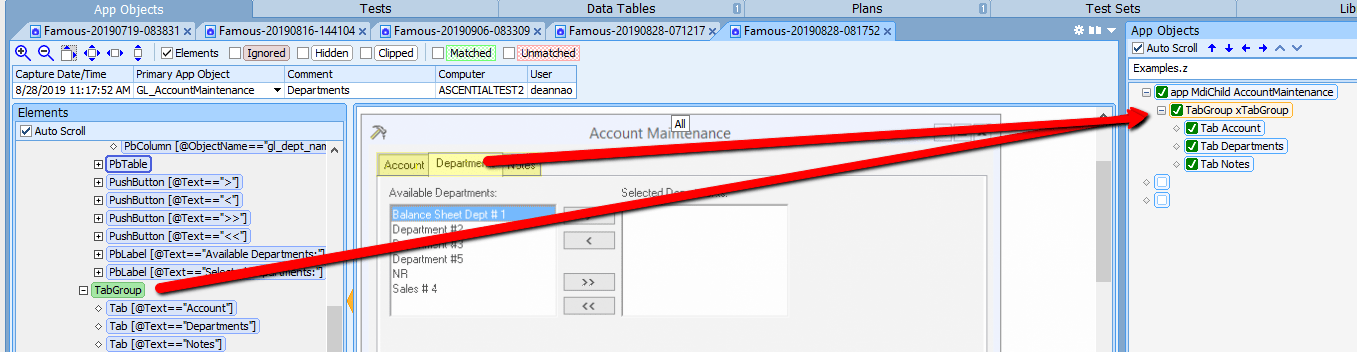
Our preference is to rename ‘xTabGroup’ to ‘Tabs’. You may adopt your own naming convention.
Defining the Tabbed Windows:
The next step is to define the tabbed windows. It is at this point where your application may differ from our examples since there are a lot of different ways that tabbed windows can be implemented. Nevertheless, you will be able to use our examples as a reference. If you have any doubts, send the snapshot to [email protected] and ask for suggestions.
In this first example, the tabbed window is a member of the class ‘PbForm’:
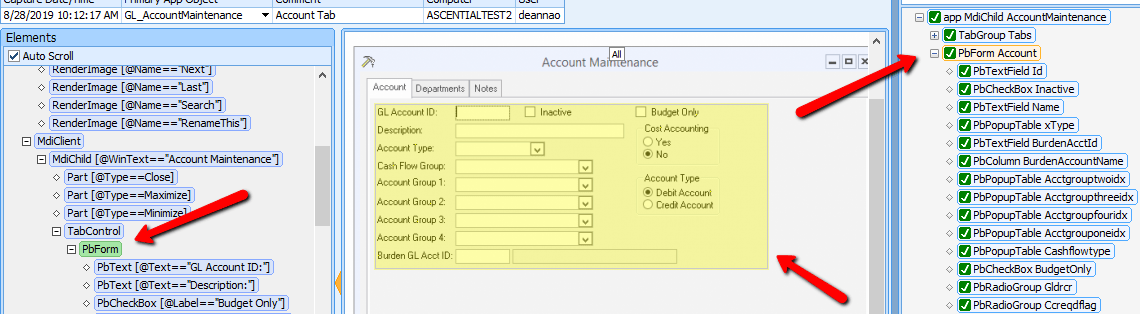
The easiest way to define it, is to drag the PbForm element from the Elements panel to the App Objects panel. Then drag all of the elements on the form from the Snapshot image. Remember you can hold down the <Ctrl> key and click on the elements that you want to define, so that you can drag them as a group instead of defining them one by one.
In this second example, the tabbed window is a member of the class ‘Window’:
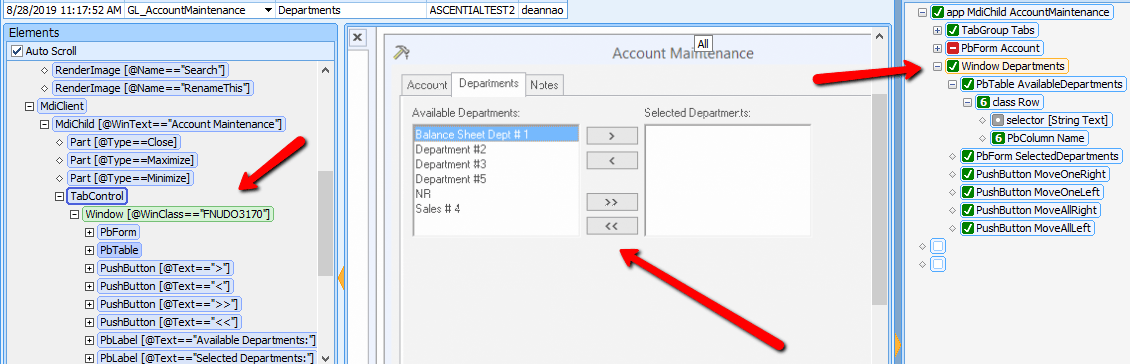
To define an object of the class ‘Window’, drag the Window element from the Elements panel to the App Objects panel. In the App Object Editor, change the Object Class to ‘Window’. Then right-click on the Window element in the Elements panel and copy to the clipboard. Paste the contents of the clipboard into the path statement and provide a meaningful Object Name. Then drag all of the elements on the window from the Snapshot image. Remember you can hold down the <Ctrl> key and click on the elements that you want to define so that you can drag them as a group instead of defining them one by one.
If you have any questions about defining your tabbed windows, please contact Zeenyx Support at [email protected]. We are here to answer your questions.

 Brian has been working in the field of test automation for more than 30 years. Brian began as a QA Engineer using the testing tools available in the early 1980’s. He joined Segue Software in its infancy and served as the EVP of R&D during that company’s golden years. Brian formed Star Quality, a consulting firm specializing in test automation in the late 90s. After 12 years of experience in the trenches, he’s excited to be building the next generation testing tool that will increase the productivity and and effectiveness of test and development teams.
 Dave is a pioneer in the field of automated testing. Dave developed ATF, one of the first automation tools, more than 20 yeas ago. He was a founder and Chief Architect of Segue Software, Inc., the original creators of QA Partner/SilkTest. Dave believes that no testing tool can be easy to use without a solid foundation. That’s why he is committed to providing AscentialTest’s universal agent with the most powerful object recognition engine in the industry.