The AscentialTest selector is a powerful feature that provides a way to select one or more rows in a table. Once the row has been selected, it’s easy to get, set or verify values for any column/cell in the row. Although the selector has many other applications in AscentialTest, this paper concentrates on how to create and use selectors with table rows.
The examples in this document use a PowerBuilder data window to demonstrate the AscentialTest selectors, but the concepts described can be generalized to any target application containing a table.
The image below depicts an example table. Notice that it is a PbTable with 126 rows.
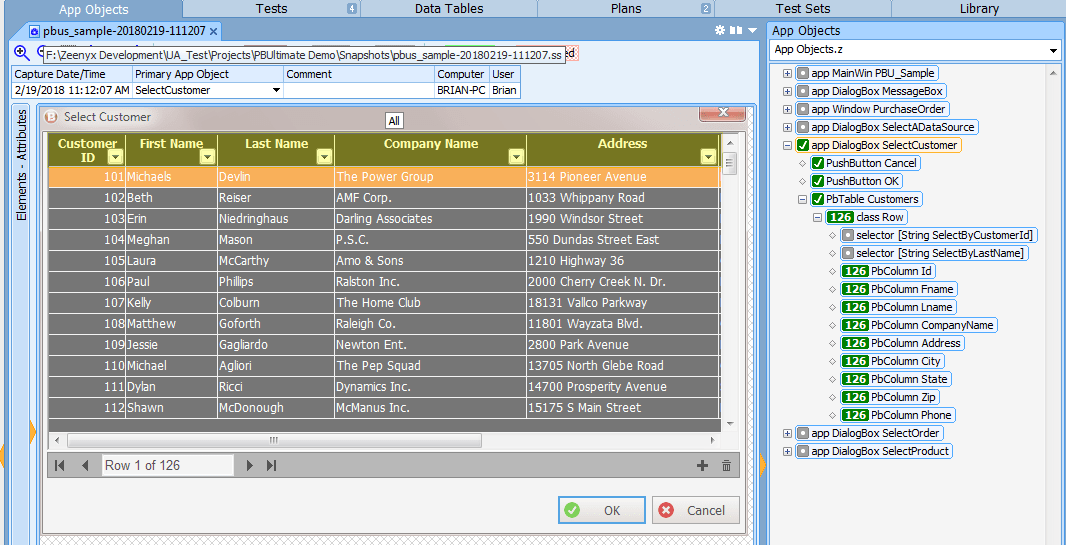
Figure 1
For the table called ‘Customers’, displayed in Figure 1, metadata has been enabled by clicking the checkbox to the left of ‘CustomersRow’ as shown below in Figure 2. Checking that checkbox provides the mechanism for creating the record to store the contents of a row. Enabling that metadata is necessary to use some of the features described below.

Figure 2
The selector explained
The selector is a very useful tool when working with complex objects like tables. Notice in Figure 3 below that the selector is a child of the table row. In many cases, AscentialTest automatically defines selectors as a part of App Object definition. But it’s useful to understand selectors so that you can create them manually or improve upon those that are automatically generated.
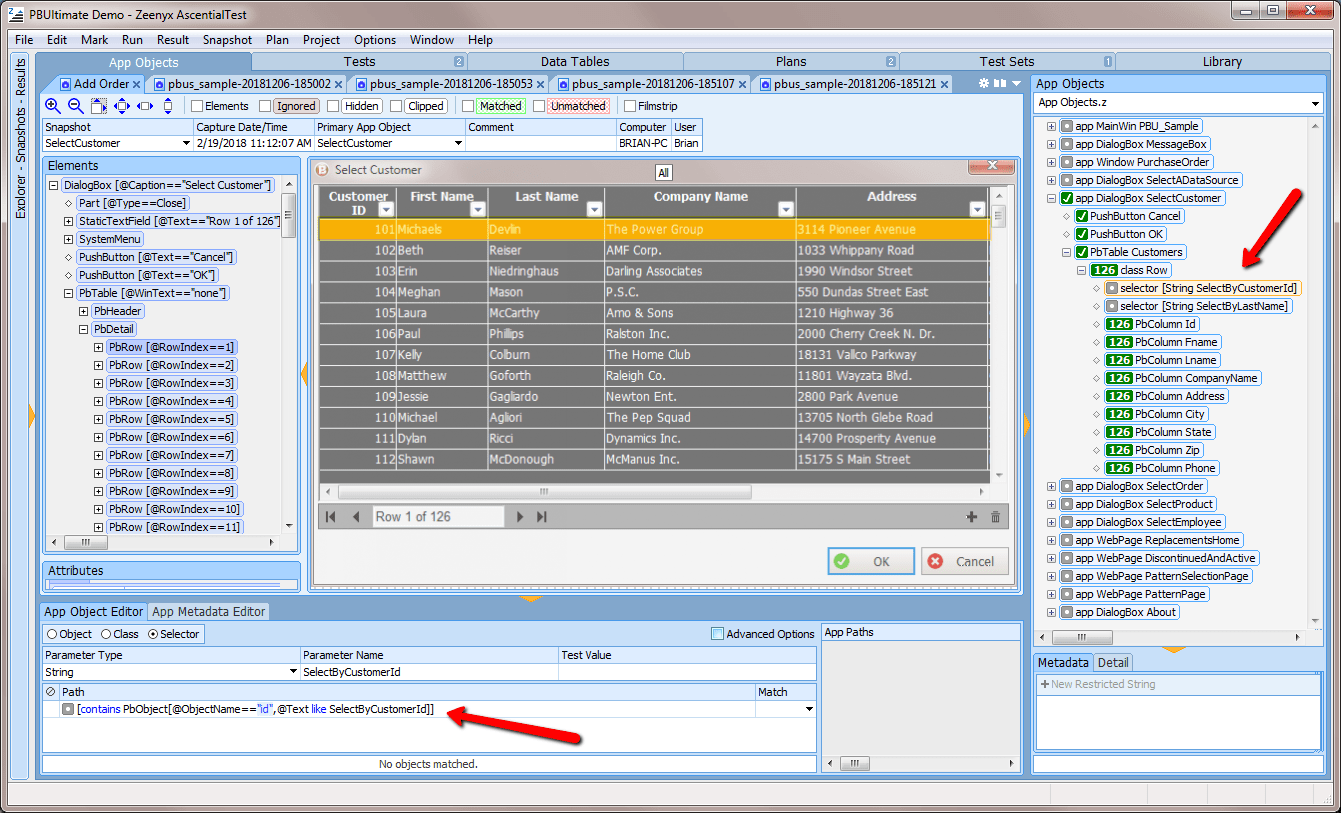
Figure 3
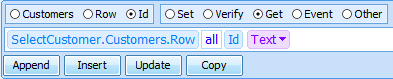
Figure 4 provides a closer look at the selector. A selector has three components: Parameter Type, Parameter Name and Path:
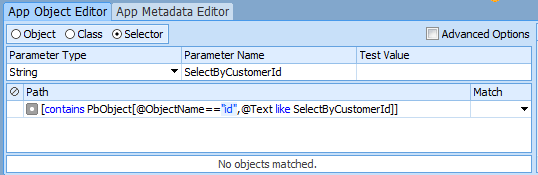
Figure 4
The Parameter Type will almost always be ‘String’ because ‘Integer’ selectors are built in. The Parameter Name is user-defined. By convention, we recommend that the name begin with ‘SelectBy’. Although there are exceptions to the rule, the Path almost always begins with the keyword ‘contains’. In this example, the selector will search for a PBObject with the @ObjectName attribute set to “id”. That means that this selector will only search for objects in the ‘Customer ID’ column in the sample table. The parameter of the example selector is called SelectByCustomerId. The selector will search the ‘Customer ID’ column for the value that is assigned to the parameter. It will compare that value to the @Text attribute for each row in the table. AscentialTest provide the ‘Test Value’ field in the App Object Editor to make it easy to confirm that a selector has been properly defined. In Figure 5 below, the value “103” is set in the ‘Test Value’ field. A match is found because the @Text attribute of the Customer ID field matches the test value in the third row. Notice how AscentialTest highlights the matching row:
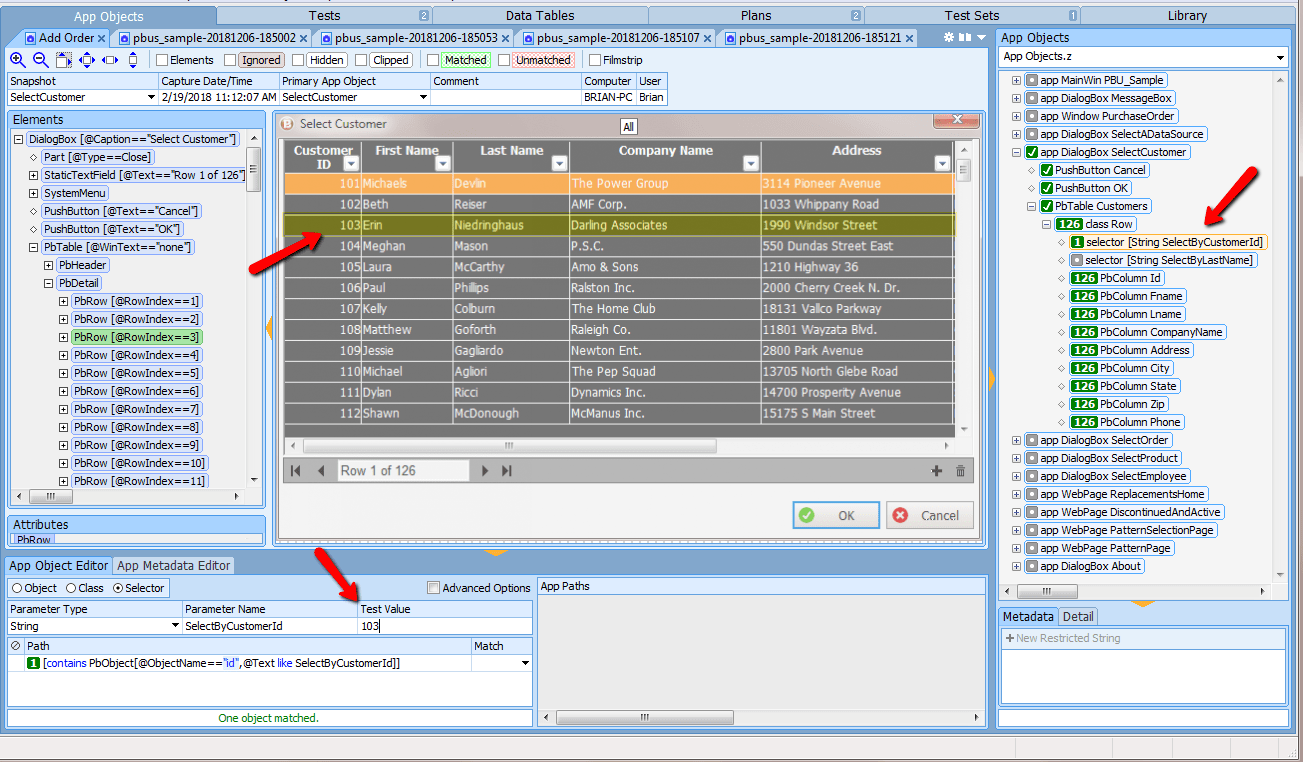
Figure 5
If more than one row is matched by the value of the selector, then multiple rows will be highlighted.
Using a selector
There are many different ways to use a selector. The most common usage of a selector is to select a row so that you can get, set or verify the value of an object in the row. In the example below, the selector is used to select the row where the ‘Customer Id’ is “103” so that the ‘Lname’ field can be verified to match the expected value of ‘Niedringhaus’.
The action can be generated using the Action Panel located below the snapshot:

Once it is inserted into the step, the statement appears like this:

A selector can also be used to get the contents of an entire row. To do that, use the ‘Get’ radio button in the Actions Panel and select the ‘Values’ property:

Click the ‘Append’ or ‘Insert’ button and the action will be generated in the open step:

To get the contents of a column using a selector, use the ‘Get’ radio button in the Actions Panel and select the ‘Text’ property. Note that the value ‘all’ is used to get the value of the ‘Id’ column for all of the rows:
Click the ‘Append’ or ‘Insert’ button and the action will be generated in the open step:

In the previous example, you learned how easy it is to get the contents of a column into a list, but sometimes it is more efficient to iterate through the rows of a table one by one, perhaps to take action for a specific value. Iterating through the rows of a table requires the use of a ‘for .. in’ loop. It’s not difficult to do once you have seen an example and you can use the Actions Explorer to get the basic structure of the loop if you are unfamiliar with it.

This simple example traverses the rows of the table and prints the value of the ‘Fname’ field for each row. Note how the value of the selector is set to the keyword ‘all’ so that all of the rows will be traversed in the loop.
Selectors for tables and rows created with RenderText
A row class created from RenderText is slightly different from that of other table rows. Figure 6 below provides a look at the App Object definition of such a row. The row class is a collection of RenderText objects that share an @VertOrder attribute value. In other words, they share a common vertical order.
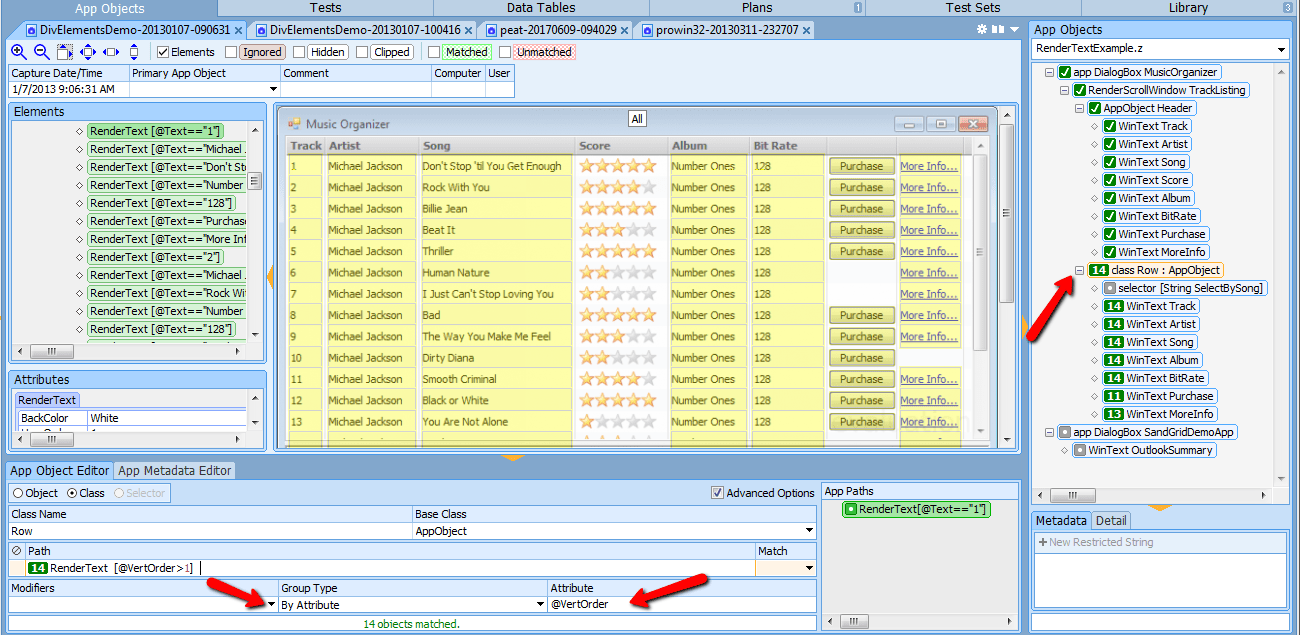
Figure 6
The selector created for the RenderText row class is also slightly different from that of other table rows. Compare the path in Figure 7 below with the path of the selector in Figure 4 above. Note that in selector for a non-RenderText row class, the path statement begins with the keyword ‘contains’, whereas the path for the selector of the RenderText row class does not.
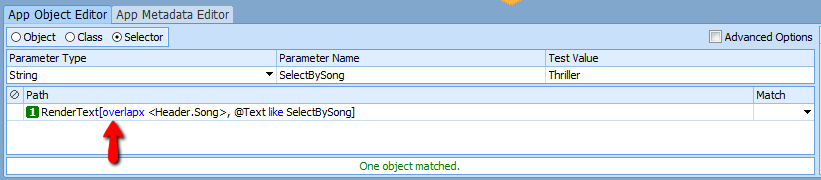
Figure 7
The reason for the difference is subtle. The RenderText row is formed by joining or grouping the RenderText together. There is no real row object. Therefore the row does not ‘contain’ a child object being used as a selector like it is in a non-RenderText row. Instead the text being searched for is part of the row definition itself. If the reason for the difference spins your head, don’t worry about it at all. Just remember the rule that ‘contains’ should not be used in the path statement for a selector of a row class defined for RenderText.
A note on selectors automatically generated with the web table wizard
If you decide to use the web table wizard to generate App Object definitions for tables on the web, you will note that AscentialTest automatically generates three selectors, based on each of the first three columns of the table. You can use those generated selectors as examples from which to build additional selectors. You also have the option to delete any of the generated selectors that will not be useful in your tests.
If you have any questions about selectors, please contact Zeenyx Support at [email protected]. We are happy to answer your questions.


 Brian has been working in the field of test automation for more than 30 years. Brian began as a QA Engineer using the testing tools available in the early 1980’s. He joined Segue Software in its infancy and served as the EVP of R&D during that company’s golden years. Brian formed Star Quality, a consulting firm specializing in test automation in the late 90s. After 12 years of experience in the trenches, he’s excited to be building the next generation testing tool that will increase the productivity and and effectiveness of test and development teams.
 Dave is a pioneer in the field of automated testing. Dave developed ATF, one of the first automation tools, more than 20 yeas ago. He was a founder and Chief Architect of Segue Software, Inc., the original creators of QA Partner/SilkTest. Dave believes that no testing tool can be easy to use without a solid foundation. That’s why he is committed to providing AscentialTest’s universal agent with the most powerful object recognition engine in the industry.