Zeenyx® AscentialTest Self-Guided Tutorial for PowerBuilder
Thank you for choosing to evaluate AscentialTest. This tutorial will guide you through the process of building an AscentialTest project for a PowerBuilder target application. It will help you learn the basic features of AscentialTest quickly so that you can apply the same techniques to your target application. Please contact Zeenyx Support at [email protected] if you have any questions during your evaluation.
Tutorial Path
There isn’t only one way to use a testing tool and that is certainly true of AscentialTest. This guide provides steps to follow so that the user will learn the primary features in a logical order. It is not intended to be comprehensive. In fact, it is purposely kept simple to teach only the basics. The product documentation is available with all of the details once basic skills have been mastered.
This guide explains the purpose and general usage for each of the following activities:
- Prepare the target computer
- Launch AscentialTest
- Create a project
- Plan tests
- Define application objects
- Manage application start-up
- Create steps
- Build tests
- Organize tests
- Run tests
- Report test results
Prepare the Target Computer
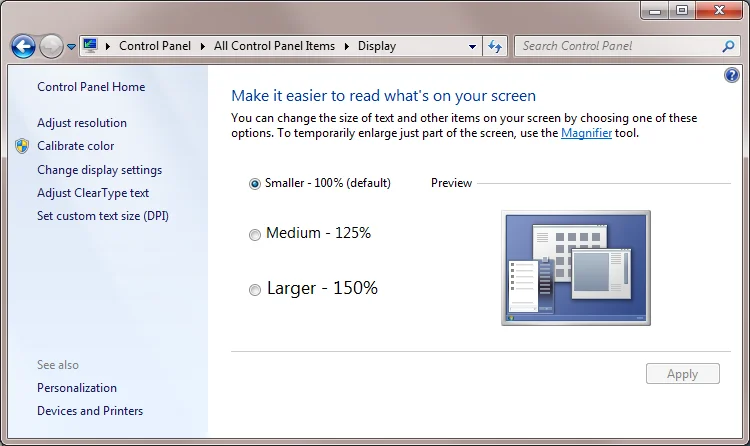
Make sure that your computer display settings are set to 100%. This is usually labeled as ‘smaller – 100% (default)’ on Windows 7 and simply ‘100%’ on Windows 10.
Some computers show a sliding scale like this:
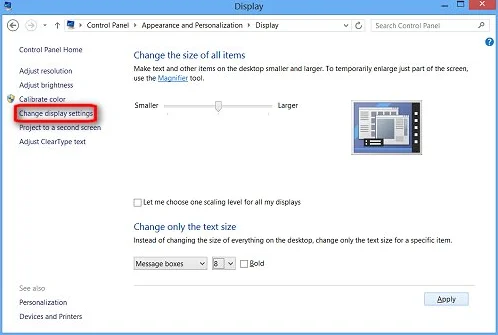
In this case, check let me choose the scaling and then you will be able to select the ‘Smaller (100%)’ option displayed above.
Launch AscentialTest
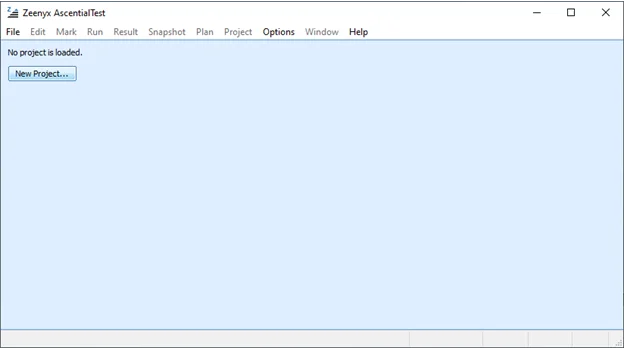
Before launching AscentialTest, be sure to place the license file provided in the ‘License’ folder of your AscentialTest installation. Look for Zeenyx Software in your Start Menu. Then select ‘AscentialTest’. The first time that you launch AscentialTest, it will invoke the default work space since no project is initially loaded. After you create your first project, AscentialTest will always load your project when it is invoked.
Create a Project
Creating a project is the first task that you will complete when you begin using AscentialTest. Click the ‘New Project’ button:
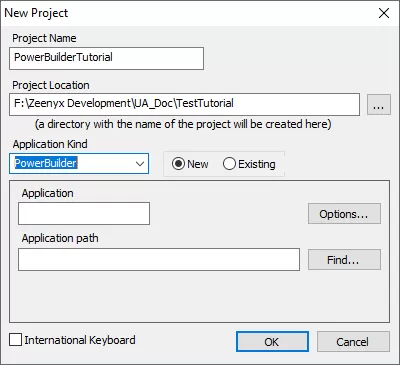
The ‘New Project’ dialog displays:
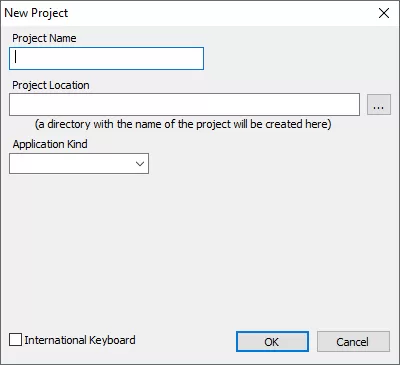
Provide the Project Name and Project Location. Then select ‘PowerBuilder’ from the Application Kind dropdown:
Provide the name of the Application and the Application Path as shown below:
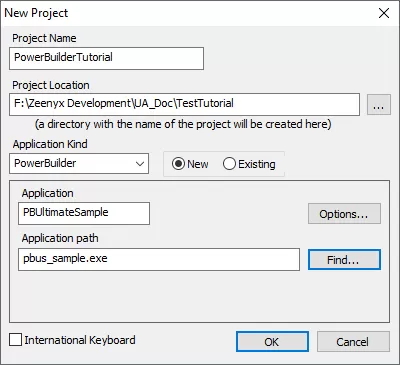
If you are using a non-English keyboard, check the International Keyboard checkbox. Then click the ‘OK’ button.
You will notice that UA Server will automatically be invoked by AscentialTest. If you click on the  icon in your system tray, you will notice that the process gets registered in the Applications Panel of UA Server:
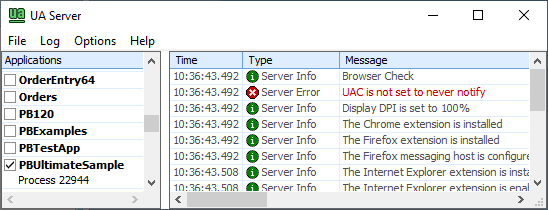
You must close and restart the target application so that AscentialTest can ‘hook’ into the application process.
Plan Tests
We recognize that not every organization writes test plans so we provide two very different ways of using the Test Plan Editor. For those of you that do write test plans, you can choose to write a structured outline like the one pictured below or you can simply create a list of test descriptions. The text that you provide for those descriptions can be just a few words or you can write an entire story. It’s completely up to you. For those who do not write test plans, we provide an alternative mode where the test plan becomes a container to organize tests so that they can be executed together.
For this tutorial, we will write a simple test plan like the one pictured below so that you can learn the most common approach:
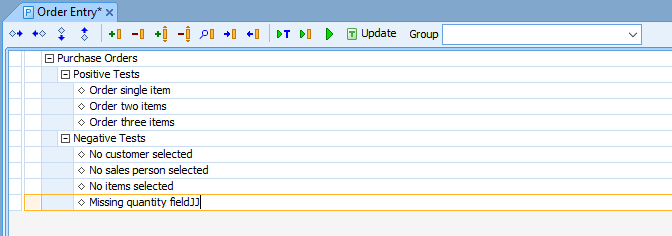
To create the test plan above:
- Right-click on ‘Plans’ in the Project Explorer to add a new plan.
- Provide a name for the new plan.
- Add test descriptions.
- Use the <TAB> key for indentation to form an outline just like in a common text editor.
Define Application Objects (App Objects)
AscentialTest is an object-oriented testing tool. By defining objects and referring to them by name, tests are insulated from changes in the target application, reducing the amount of work required to keep tests up to date. When there are changes to the GUI of the target application, you can make changes to the object definitions without having to change any of your tests. App Objects provide a single point of change.
‘Snapshots’ are central to the process of defining objects. Snapshots are smart images that contain an image of a page or screen along with all of the contained objects and their attributes. The process of defining App Objects is through drag and drop. It’s easy to do and AscentialTest provides plenty of feedback so that you can be assured that objects are being uniquely identified. Once a page or screen has been defined, you will continue to use that definition over a long period of time. You only need to modify the definition if there are changes to the application objects.
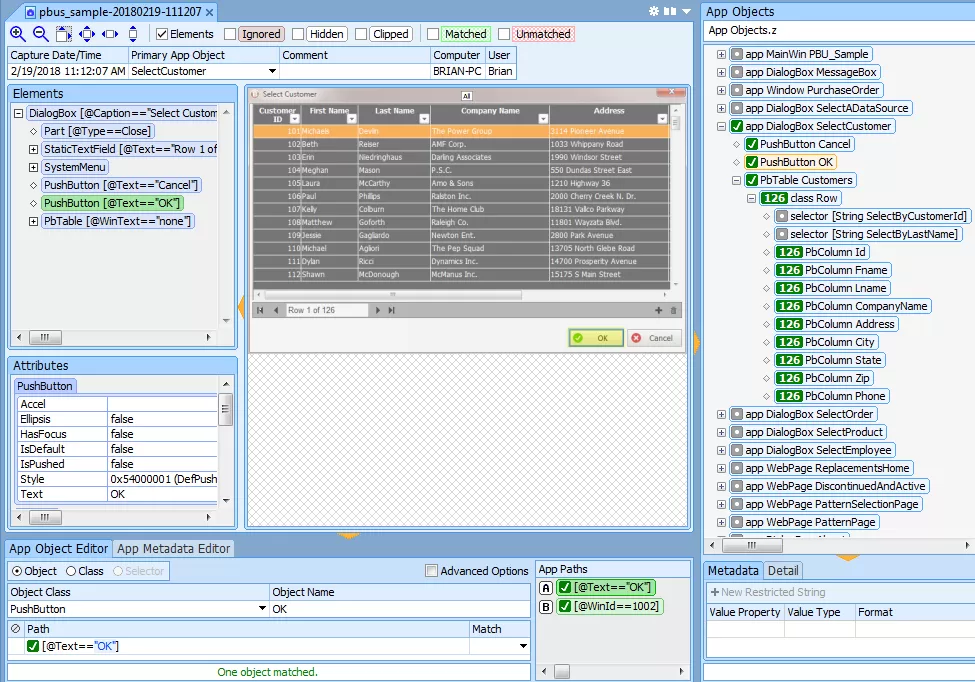
The Snapshot Viewer panels in image below combine with the App Object Editor to provide a way to define application objects such as ComboBoxes, PushButtons and TextFields via a drag and drop interface.
To create App Objects:
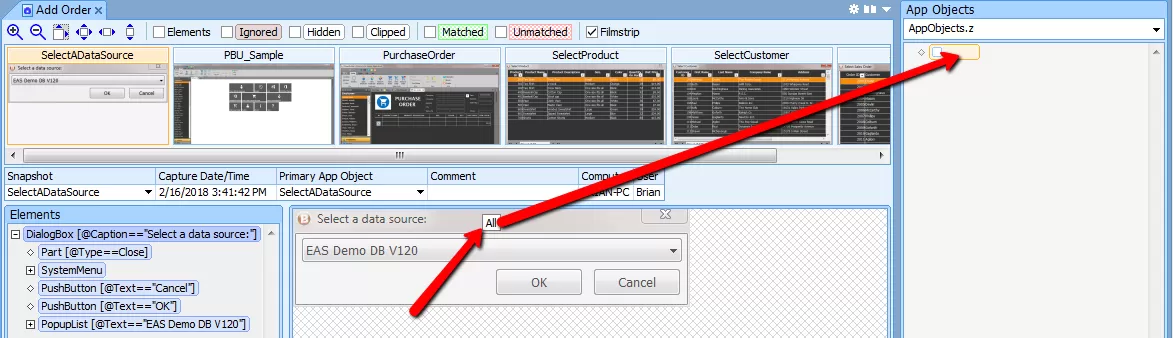
- Take a snapshot for each of the pages displayed below. To take a snapshot, point the mouse in the middle of the target page or screen, hold down either <Ctrl> key and press either <Shift> key. You will see a flash and hear the sound of a camera shutter.
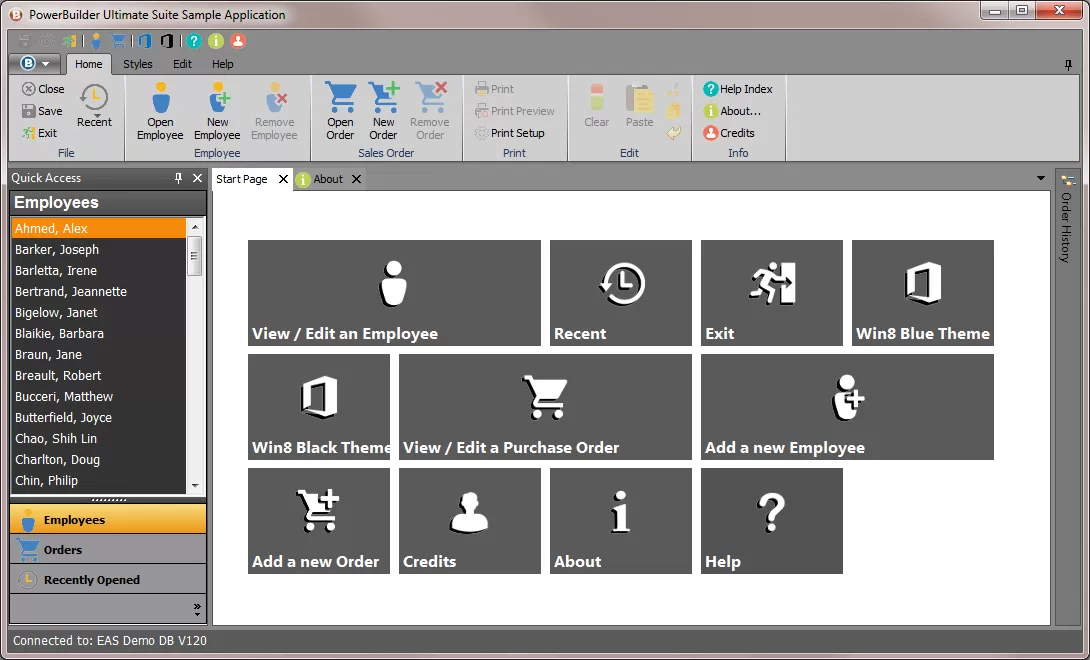
a. Initial window that comes up when you launch the PBUS Sample Application:
b. The application’s main window:
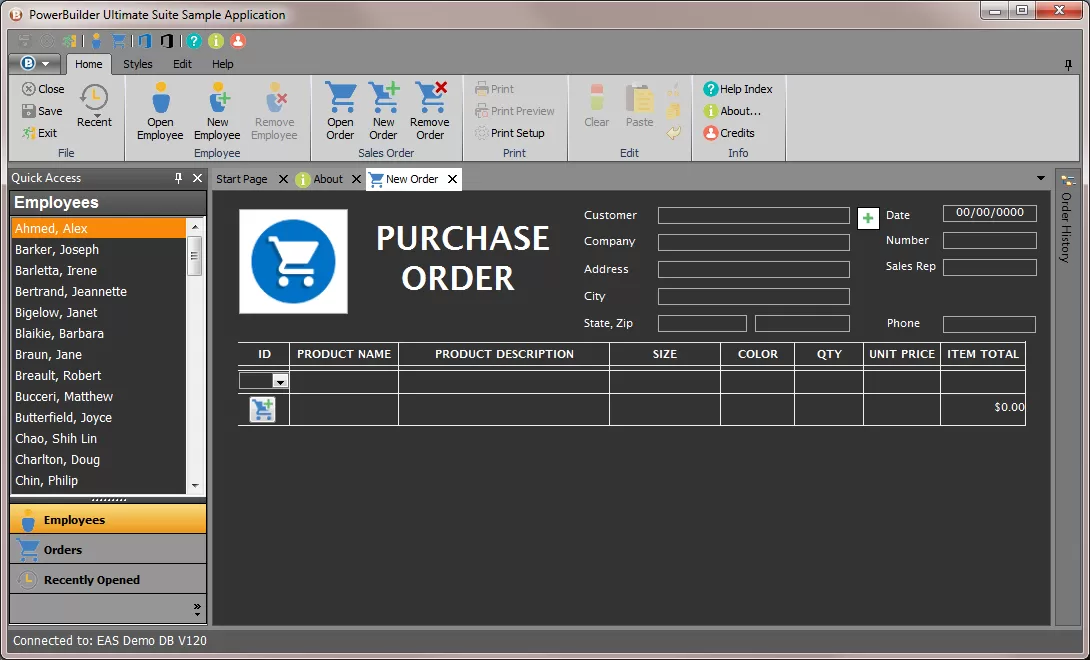
c. Click on  to launch the Purchase Order window:
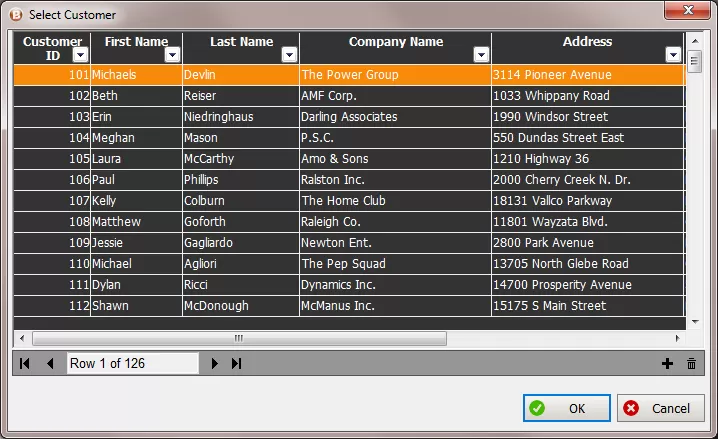
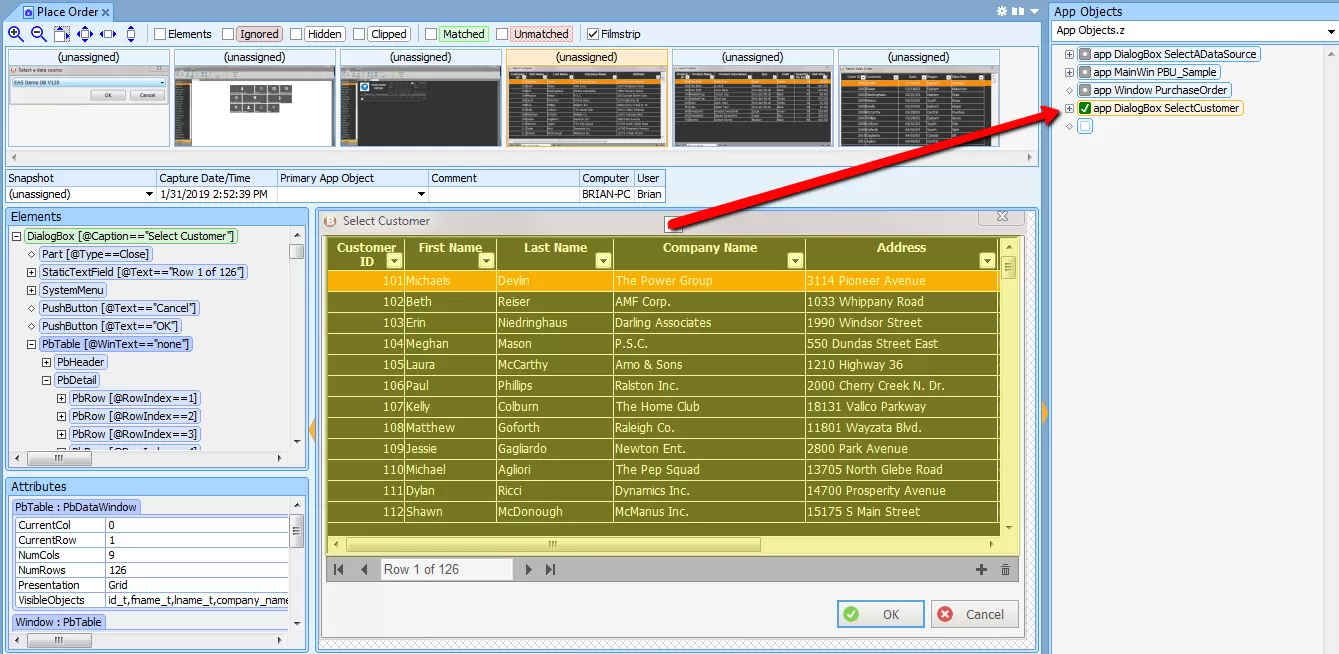
d. Click  to invoke the Select Customer dialog:
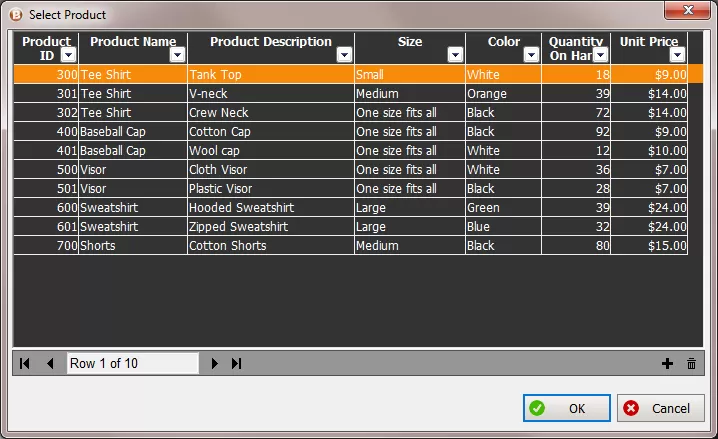
e. Click on  to invoke the Select Product dialog:
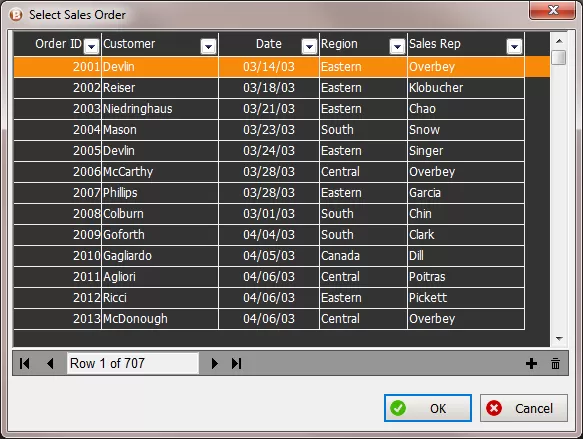
f. Click on  to launch the Select Sales Order dialog:
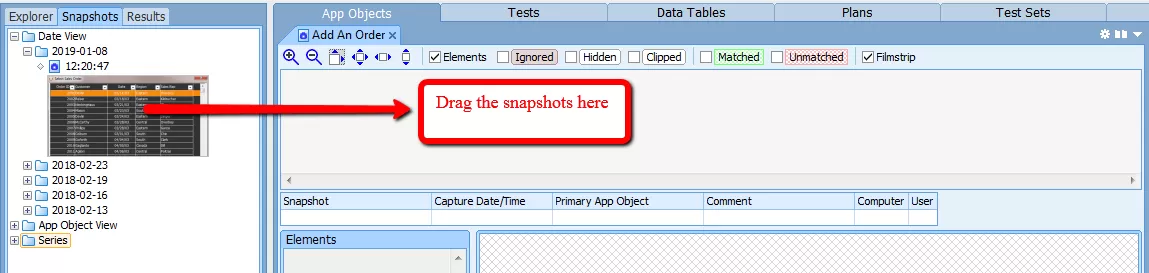
- Create a Snapshot Series that includes the six snapshots that you have just taken. To create a Snapshot Series, right-click on ‘Series’ in the Snapshots tab of the Project Explorer and provide a series name. Drag the snapshot thumbnails from the Date View to the ‘filmstrip’ area at the top of the Series workspace. Once you create the series, you can close all of the other snapshot tabs to unclutter your workspace.
- Define application objects by dragging from the snapshot image to the App Objects panel located to the right. There are two different ways to accomplish this:
- Define the page or screen by pressing the mouse on the caption and dragging to the App Objects panel:
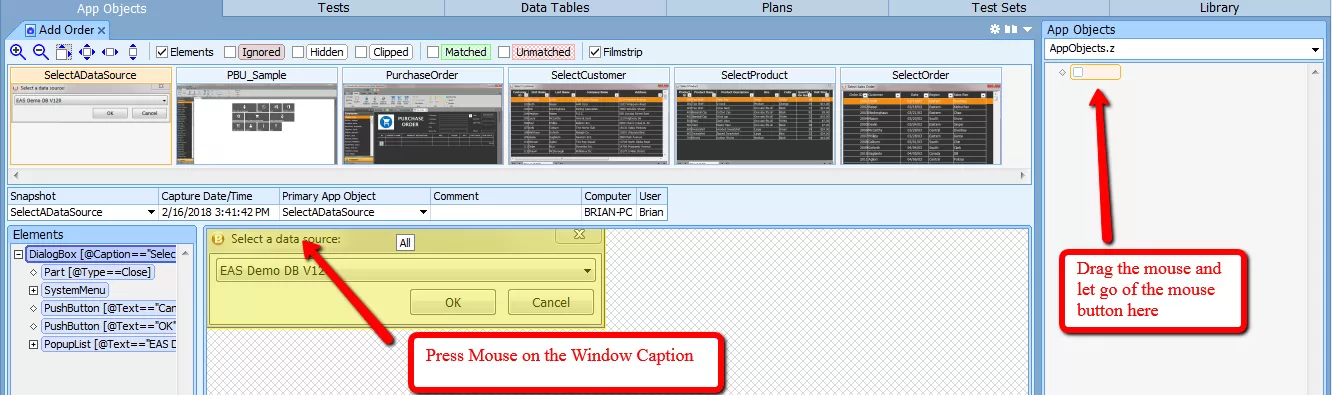
Then drag each object object that you will use in your tests:
-
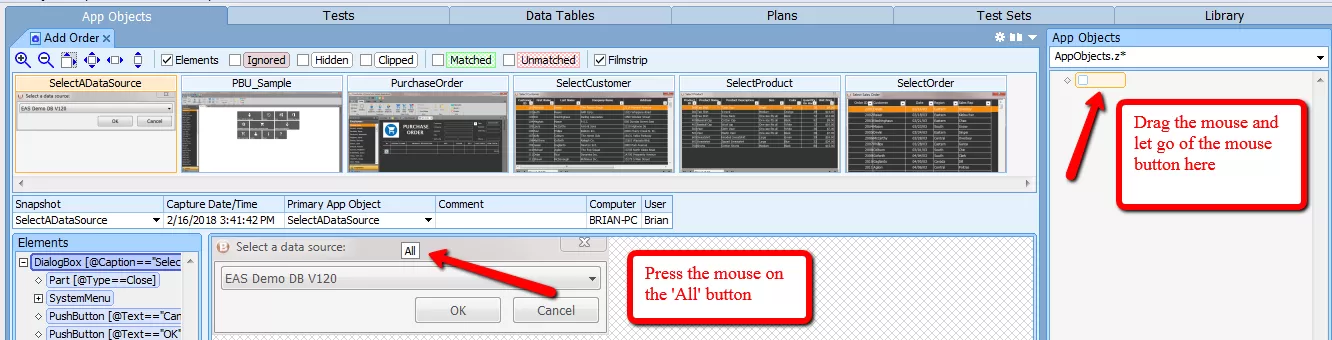
- As an alternative, you can press the mouse on the ‘All’ button at the top of the Snapshot Image and drag it to define all of the objects contained on the screen or page.
- Create App Objects for all of the application elements in the six snapshots that comprise the snapshot series. We’ll take them one at a time.
- Select the first snapshot in your snapshot series. It is the window that pops up when you launch the sample application.
- Grad the
 button and drag it to the App Object tree on the right.
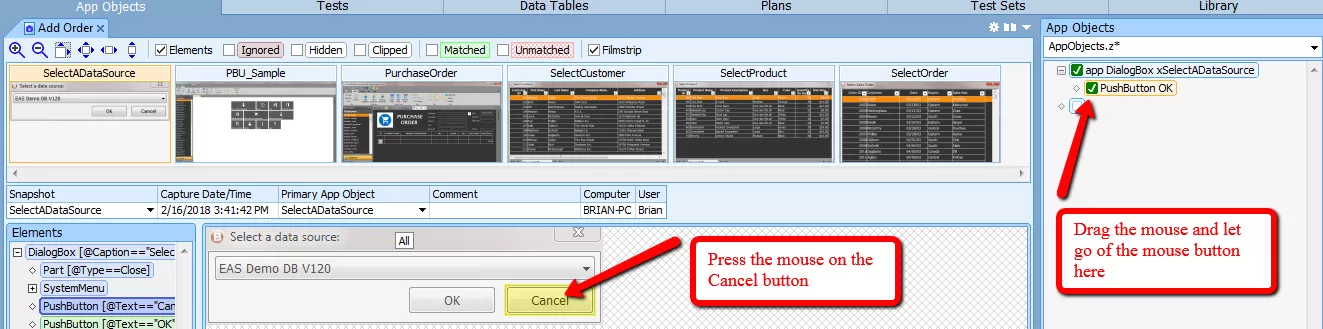
- The dialog box and its elements are all defined automatically:

- Select the second snapshot in the series and drag the caption bar to the App Object tree on the right:
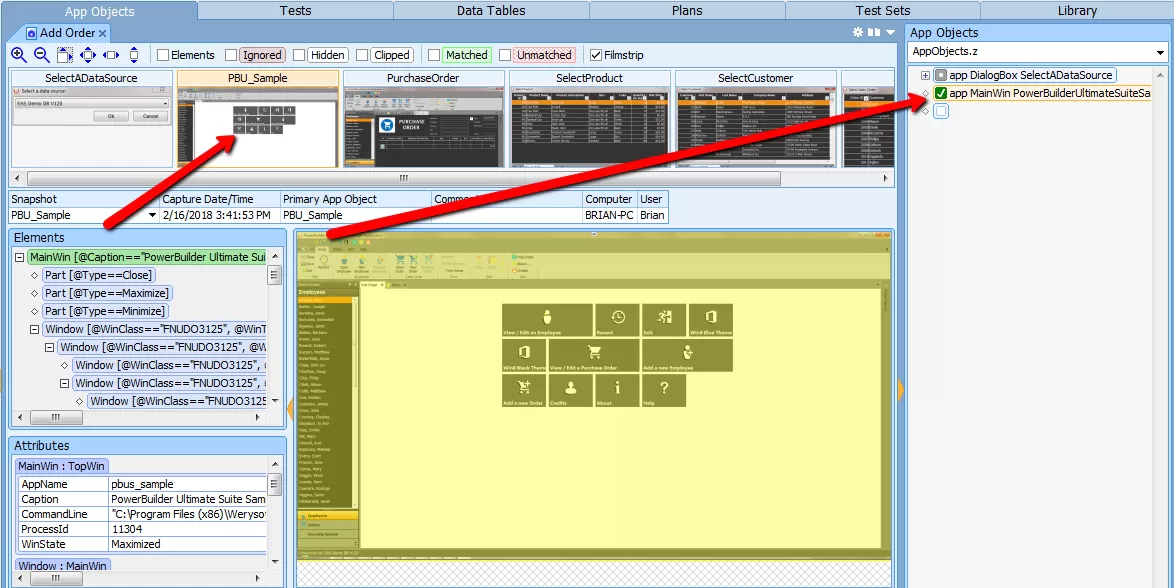
- The name that was generated for the App Object that you just defined is long. You can change the name in the App Object Editor.
- There is a special process for creating App Objects that are image-based. Follow these steps to create the App Object for the ‘New Order’ button:
- Create an AppObject for the tool bar:
- Right-click on the App Object for the PBU_Sample and select ‘Insert Line After’.
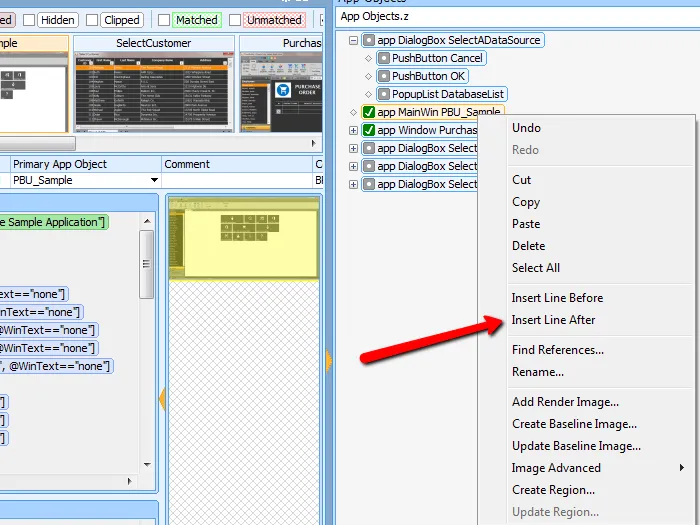
- Select the line and indent using the <Alt-Right Arrow> keys.
- Locate the App Object Editor below the snapshot image and configure it to match the image below:
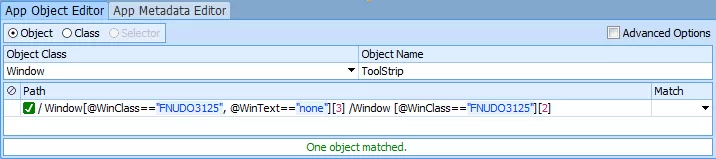
- Use this string for the path:
/ Window[@WinClass==”FNUDO3125″, @WinText==”none”][3] /Window [@WinClass==”FNUDO3125″][2]
- It is beyond the scope of this tutorial to discuss the path statement. You will be learning more about paths as needed.
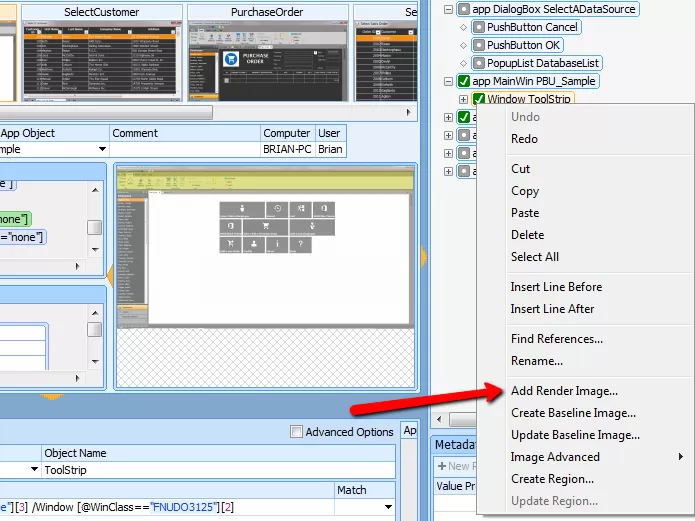
- Use your favorite snip-it tool to grab the image of the ‘New Order’ button and put it on the clipboard.
- Right-click on the ToolStrip that you just defined and select ‘Add Render Image’:
- Click the ‘Copy Clipboard’ button, provide a name with no spaces in it:
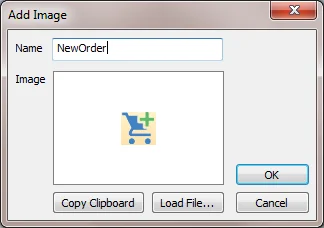
- Click the ‘OK’ button. The object will be defined automatically.
- Follow the same procedure to define the ‘Save’ button
 in the upper left corner of the target application.
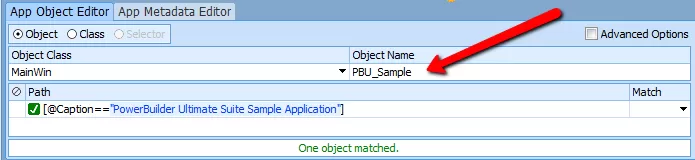
- In this step, we’ll learn how to create an object definition manually. Select the third snapshot in the series. Then in the App Object tree, right-click on the definition for PBU_Sample and select ‘Insert Line After’ (It helps to collapse all of the nodes in the tree structure first). In the App Object Editor, select ‘Window’ from the Object Class dropdown and provide the Object Name ‘PurchaseOrder’:
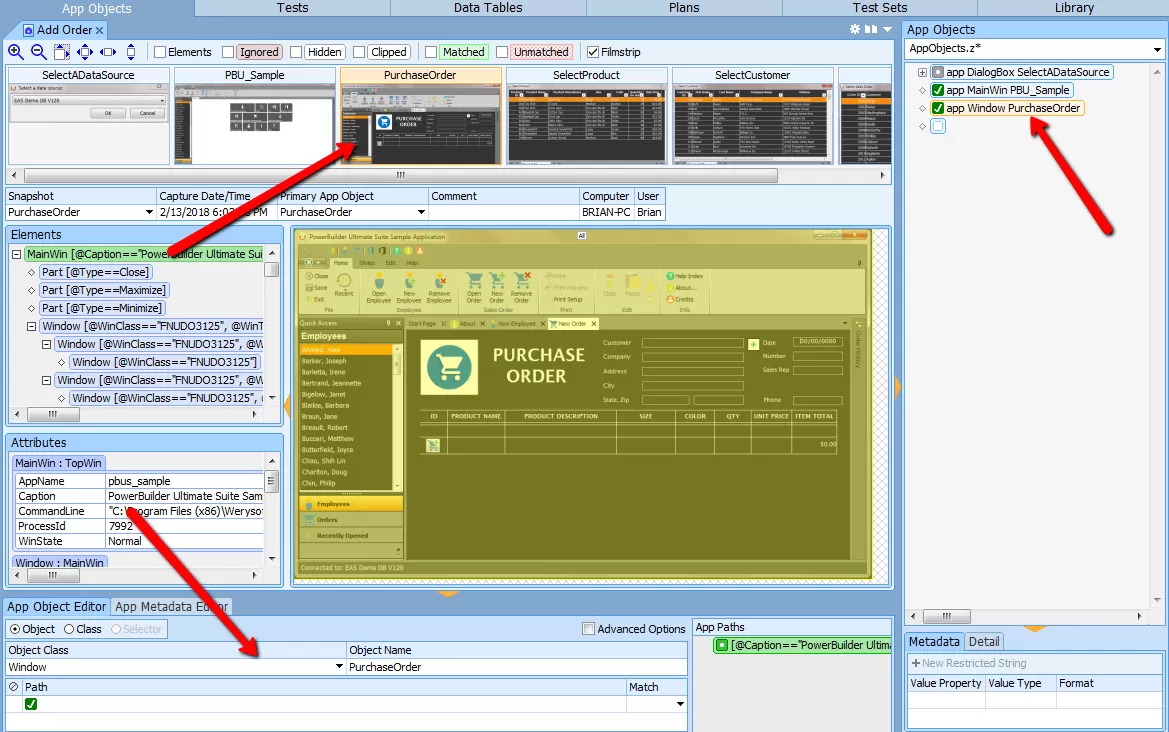
- Use this string for the path:
MainWin [@Caption==”PowerBuilder Ultimate Suite Sample Application”]/[@WinClass==”FNUDO3125″, @WinText==”none”][1]/ Window [@WinClass==”FNUDO3125″, @WinText==”none”][3]
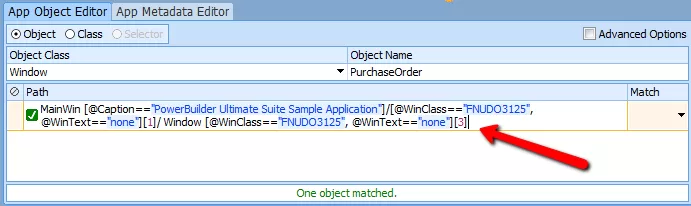
- It is beyond the scope of this tutorial to discuss the path statement. You will be learning more about paths as needed.
- There are several elements on the Purchase Order page that need to be defined. Let’s learn how to use the ‘Elements’ tree to define those objects:
- Locate the PbPopupTable element in the Elements panel as shown below and drag it beneath the ‘PurchaseOrder’ AppObject:
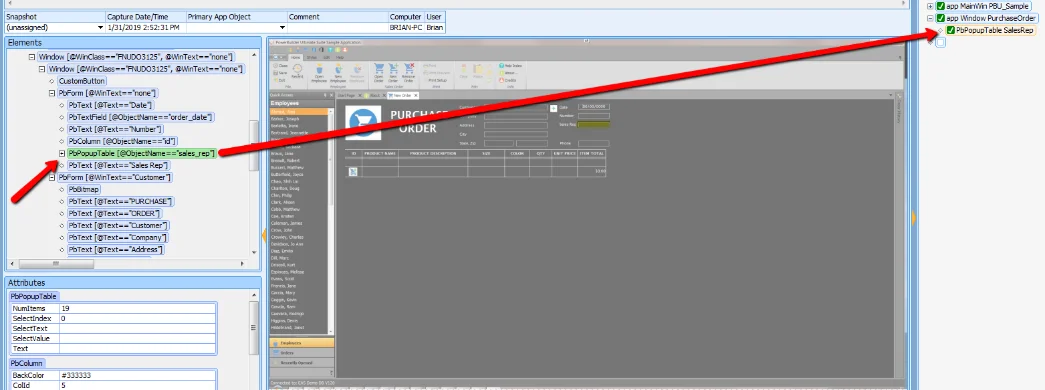
- Locate the Custom button element in the Elements panel as shown below and drag it beneath the ‘SalesRep’ AppObject:
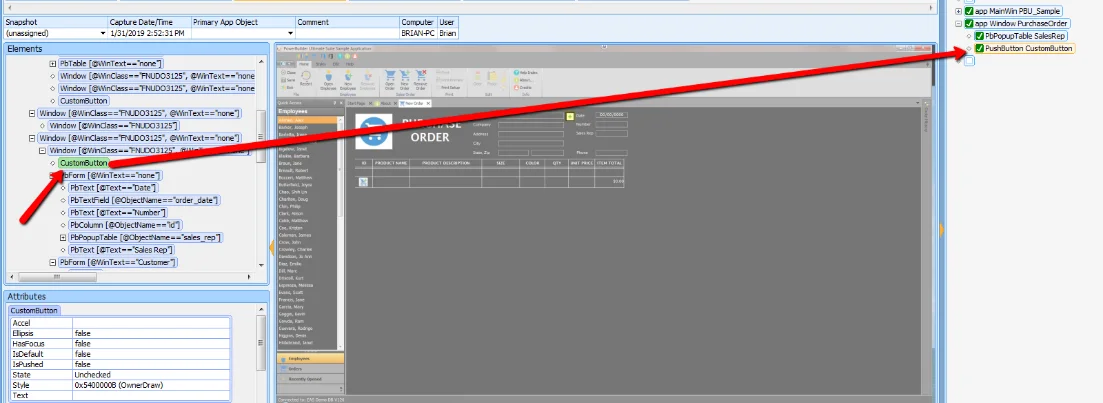
- Right-click on the node that you just created and select ‘Rename’. Rename the ‘CustomButton’ to ‘InvokeCustomer’ which is much more descriptive.
- Locate the PbTable element in the Elements panel as shown below and drag it beneath the ‘InvokeCustomer’ AppObject:
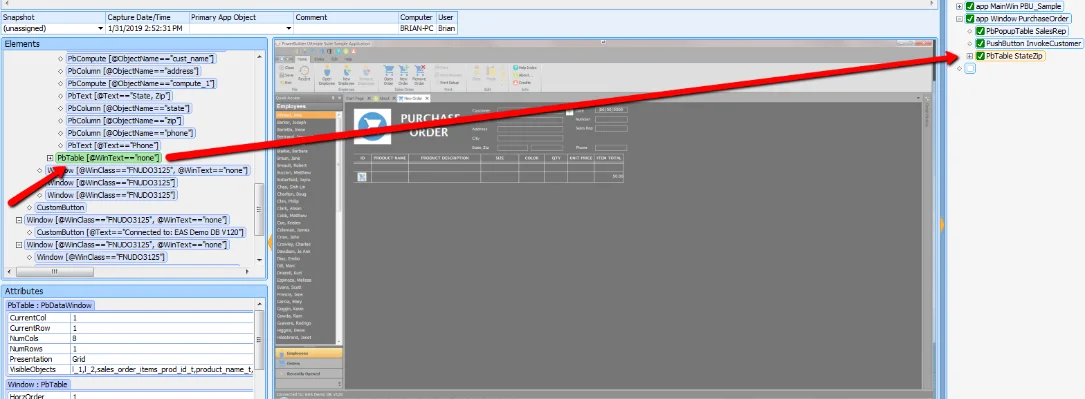
- Rename the ‘StateZip’ to ‘Items’.
- Select the forth snapshot in the series and drag the
 button over to the App Object tree to define it:
- Expand the ‘SelectCustomer’ node and rename xPbTable to ‘Customers’ to provide a more meaningful name:

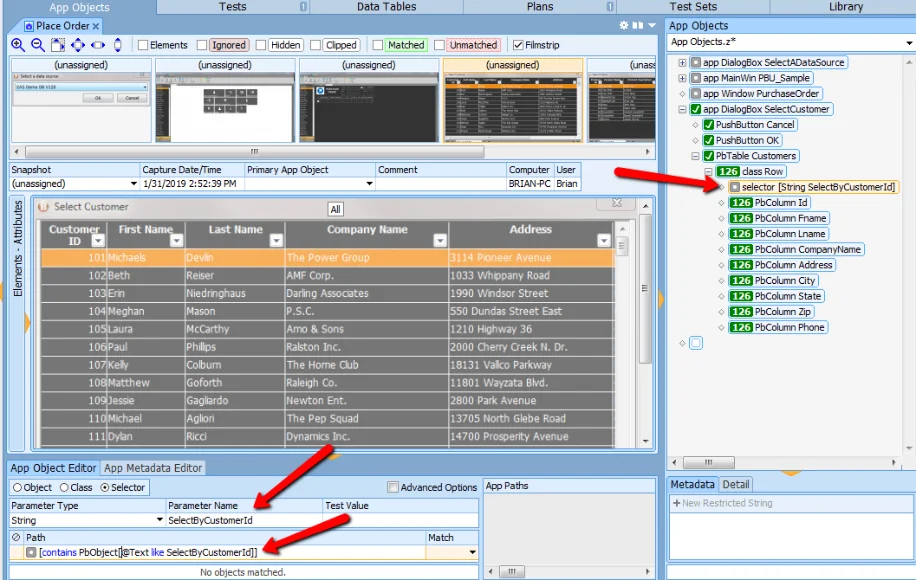
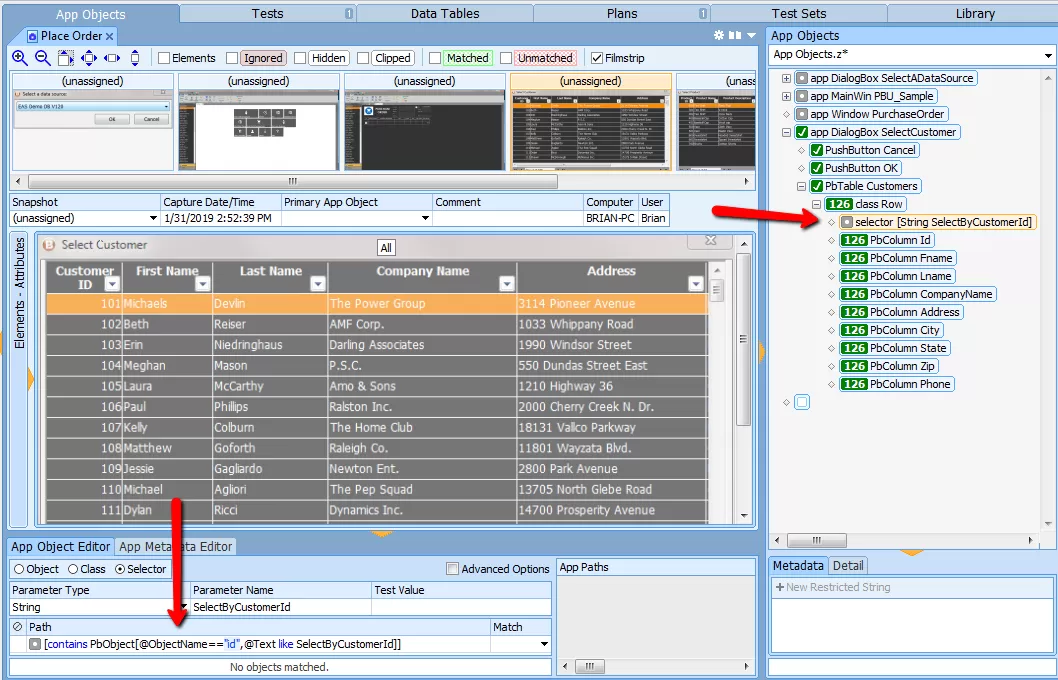
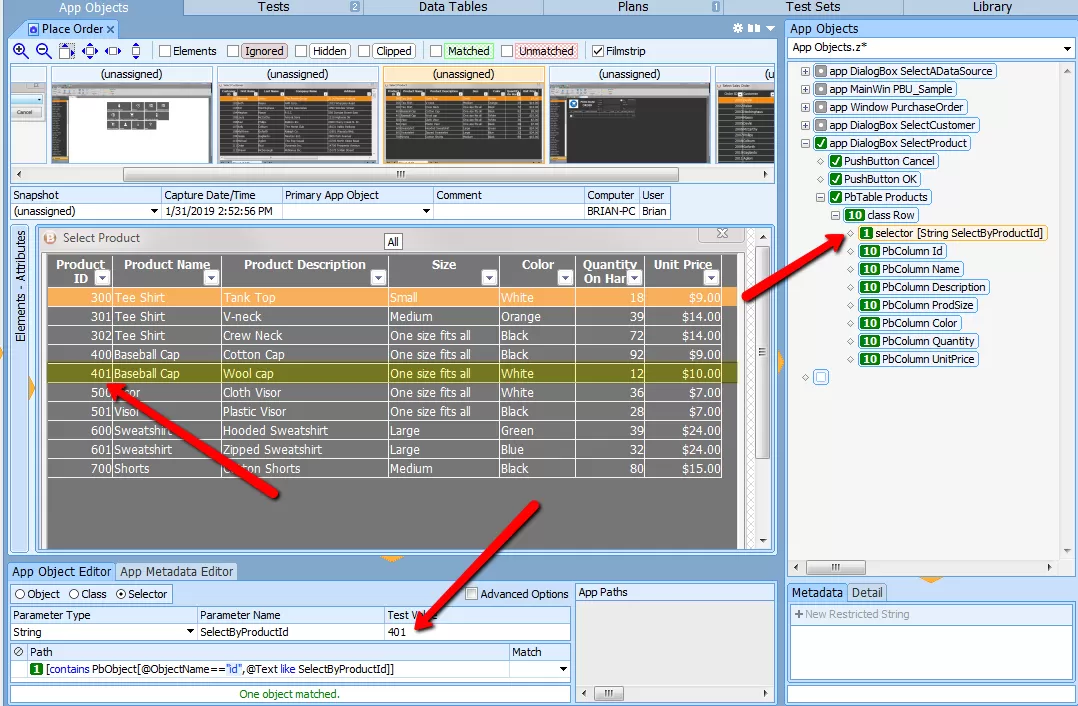
- Although the selector generated for the table will work well enough, let’s learn how to make a selector that operates on a specific column.
- Click on the Selector in the App Object tree and change the Parameter Name as shown in the image below:
-
- The path of the selector that was generated, will search for the parameter value in any column in the table. It’s definition,

should be read as follows: “search for the row that contains a PbObject where the @Text attribute is like the parameter value of SelectByCustomerId”, but since this selector is intended to operate on only the CustomerID column, the path needs to be made more specific.
-
- To make the path more specific, we need to narrow the search to only the ProductID column. To do that, click on the ‘Id’ column in the App Object tree and copy what is inside the square brackets of the path statement to the clipboard. You will be copying: @ObjectName==”id”
-
- Click on the selector again and paste the contents of the clipboard as shown in the image below. Insert a comma after the pasted text:
-
- Now let’s test the selector. Input the value ‘104’ in the ‘Test Value’ field and notice how the row gets highlighted in yellow.

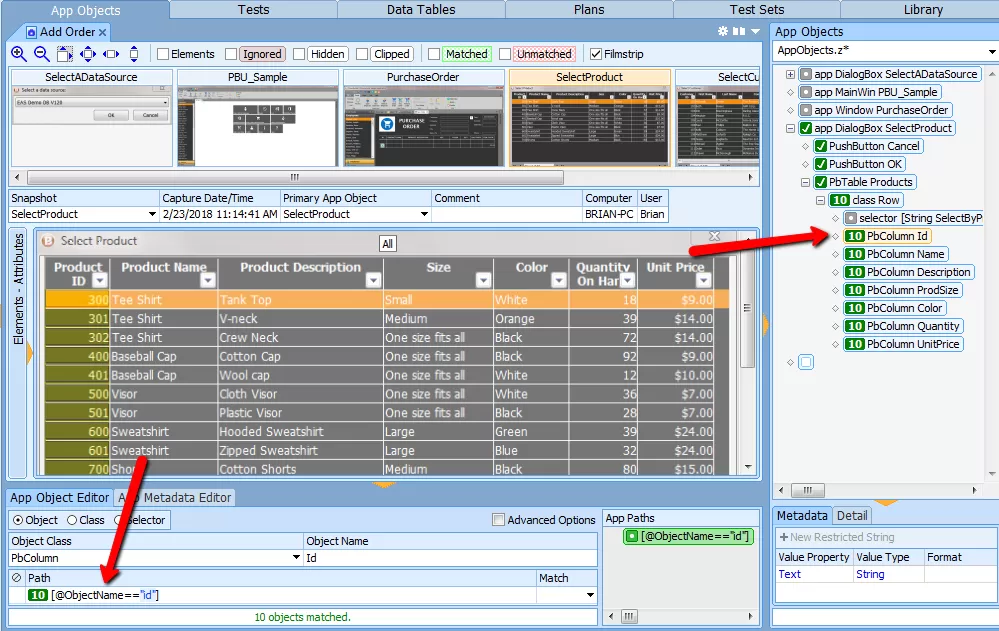
- Follow the same steps for the next snapshot in the series. You will find that you ‘Select Product’ is very similar to ‘Select Customer’.
- It is not necessary to define the last snapshot in our series since it will not be used in this tutorial. It is left to the user to decide if more practice is required. You will find that it is very similar to the previous two snapshots.
- You’ve learned a great deal about object definitions. It’s time to start learning how to create tests with AscentialTest.
Manage Application Startup
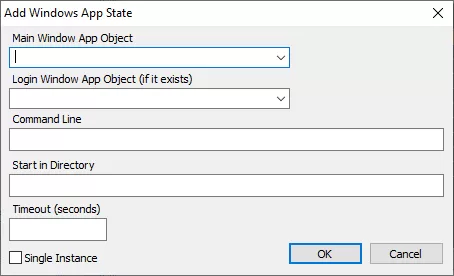
Establishing a ‘base state’ from which tests start and stop is good test design. It helps ensure that a test failure will not put the target application in a ‘bad state’, where subsequent tests cannot be successfully run. AscentialTest provides App States for this purpose. An App State can be created to make sure that the target application has been started and is in a ‘ready state’ for running tests. An App State wizard is provided for this purpose. You will notice that the yellow bar located beneath the main menu bar is prompting you to create an App State. Before you begin, select the second snapshot in your series (the main window). Then click on the link to invoke the App State wizard:
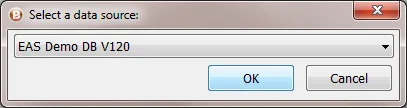
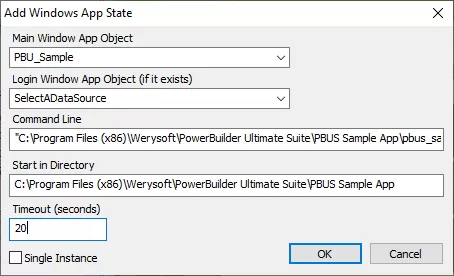
- Select ‘SelectADataSource’ from the Login Window dropdown. Then provide the ‘Start in Directory’ by copying the path from the Command Line as shown below. Then provide a ‘Timeout’. For the tutorial application, input 20.
- A new tab will open to display the AppState.
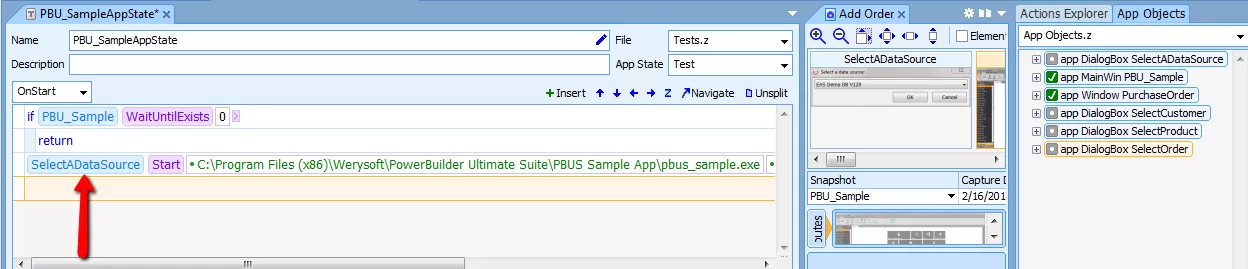
An action is required to accept the default database on the SelectADataSource dialog. Adding actions will be covered in detail in the next section. To complete the AppState, simply review this image and follow the instructions below:
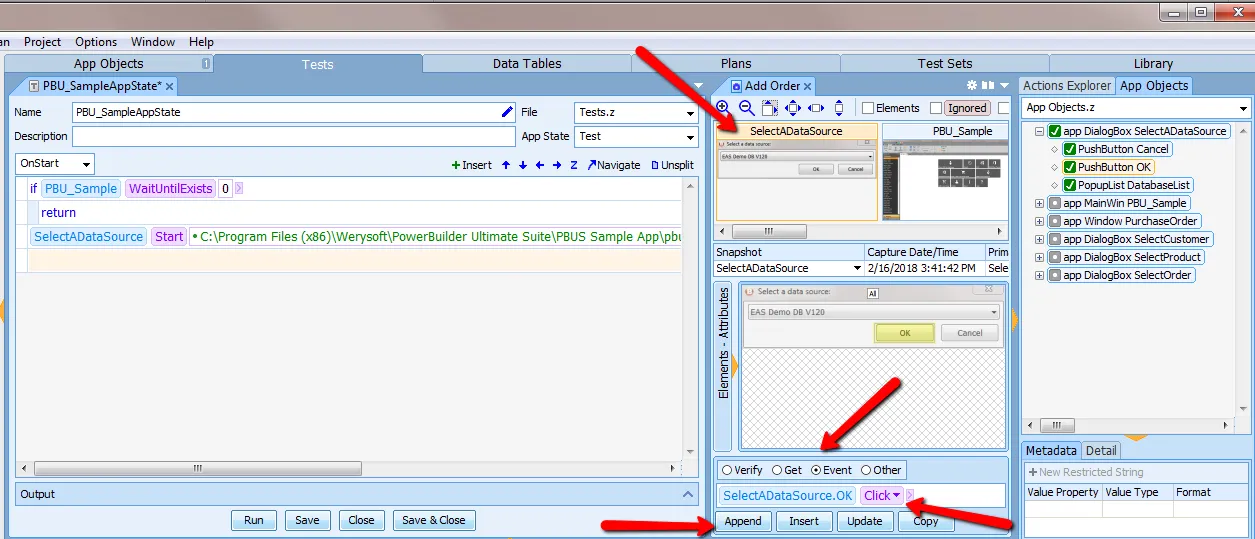
- Select the ‘SelectADataSource’ thumbnail from the Snapshot Series.
- Click on the ‘Ok’ button in the snapshot and select the ‘Event’ radio button below the snapshot image.
- Select the ‘Click’ event from the dropdown list if not already displayed.
- Click on the ‘Append’ button. The new action will be added to the App State:
- Click on the ‘Save’ button located on the bottom of the App State Editor.
Create Steps
To get an understanding of how tests are constructed in AscentialTest, a few definitions are needed:
- A Test is an ordered series of Steps
- A Step is an ordered series of Actions
- An Action is generally a ‘set’, ‘get’, ‘verify’ or ‘event’ acted upon an application object. An example of an action is a ‘click’ on a button.
It’s important to understand that steps are intended to be reusable. Once created, a step can be used in tens, hundreds or thousands of tests. If there is a change to the target application, you only need to update the impacted step. All of the tests that use that step are automatically updated. This is one of the ways that AscentialTest reduces the level of effort to keep tests up to date as the target application changes.
The Step Editor provides a way to build sophisticated automated tests by dragging and dropping from snapshots. Actions are automatically generated when the user drags an object/action to a test step. The Step Editor combines the best features of ‘recorder-based’ and ‘script-based’ approaches. It is as easy to use as a recorder, but it provides much more control and flexibility.
The image in below displays the Step Editor with a snapshot loaded and a step with three actions that have been dragged from the snapshot.
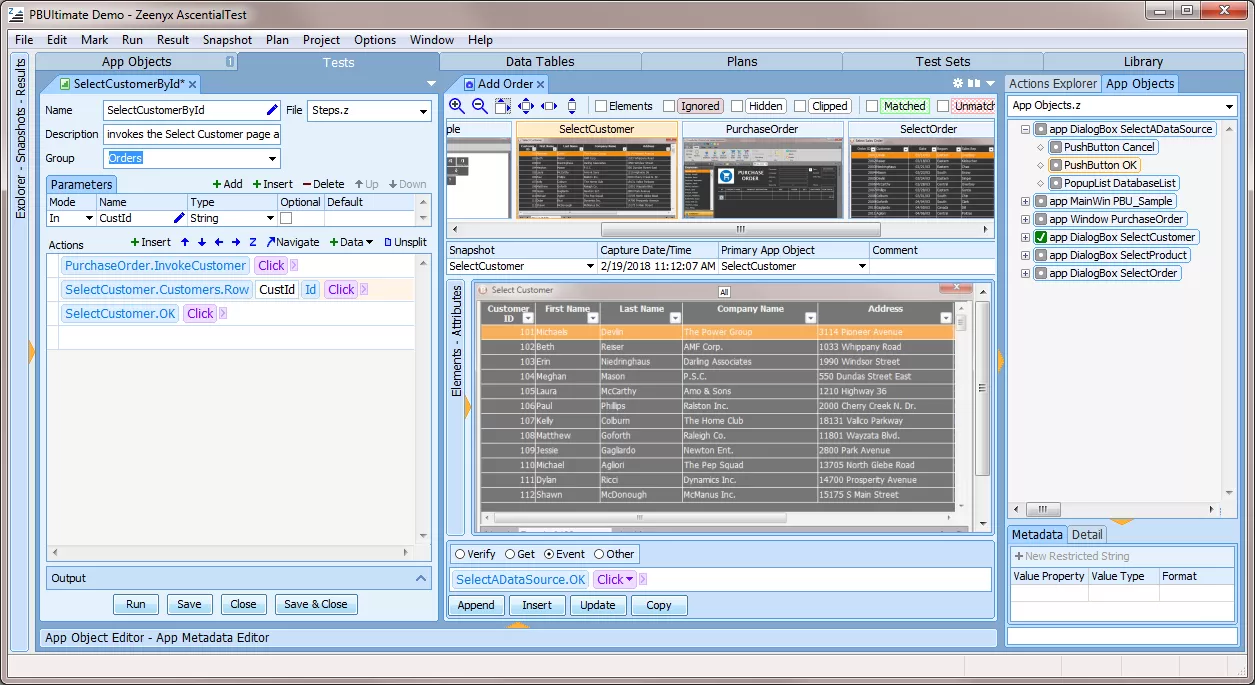
Notice the panel below the Snapshot Image. We refer to that panel as the Action Builder as it provides a way to generate actions by selecting from dropdowns.
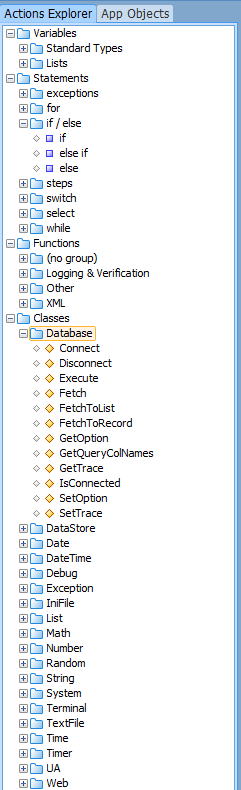
The Actions Explorer, pictured below, provides the ability to drag and drop variables, control statements, functions and methods into steps.
To Create Steps:
- Right-click on the on ‘Steps’ in the Project Explorer to add a new step.
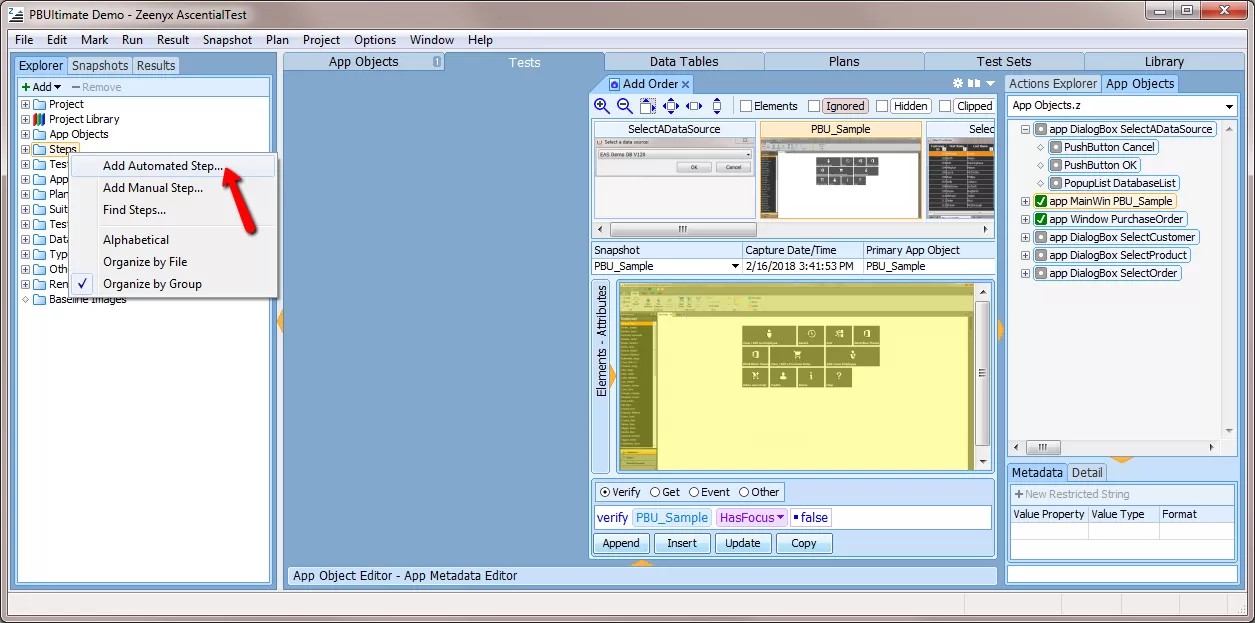
- Complete the header information at the top of the step including Name, Description and Group.

- If you snapshot series is not already open click on it in the Project Explorer so that the series is positioned to the right of the Step Editor.
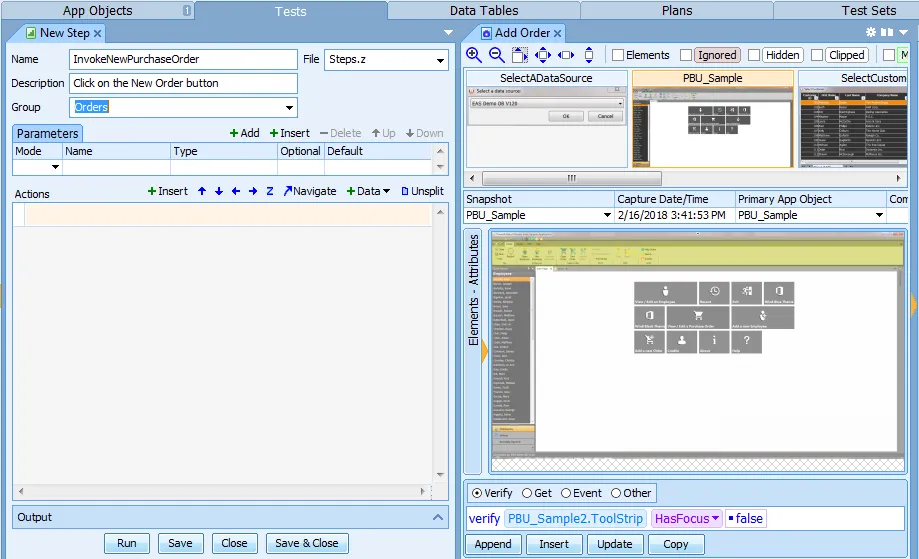
- Use the Actions Panel, located below the snapshot image to add the first action to your step. Select the ‘NewOrder’ button in the snapshot image, select the action type ‘Event’, select the ‘Click’ action from the dropdown if it is not already selected and then click ‘Insert’ button.
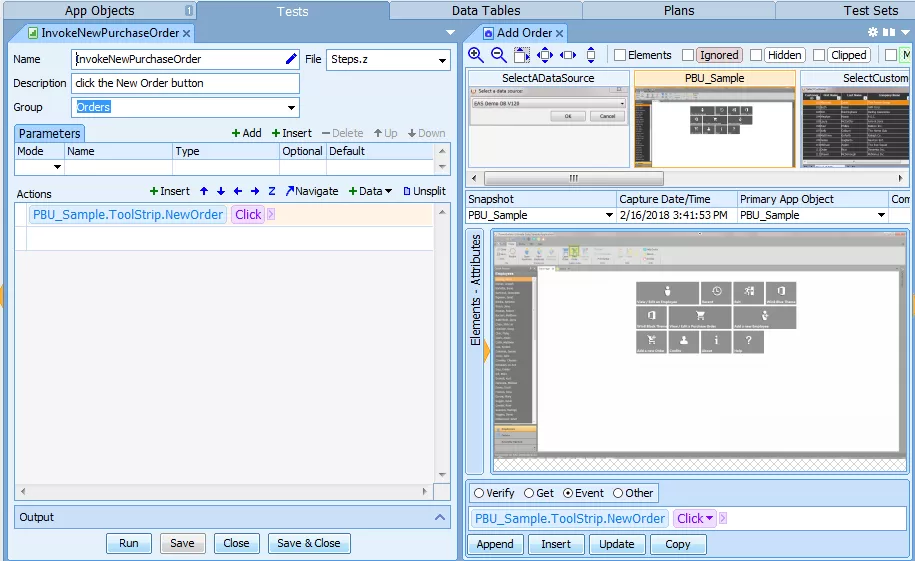
- Click the ‘Save’ button at the bottom of the Step Editor and notice how the new step is now accessible in the Steps section of the Project Explorer.
- You can test your step but clicking on the ‘Run’ button at the bottom of the Step Editor. Make sure the target application is in the proper context and that the target application is not being covered by AscentialTest.
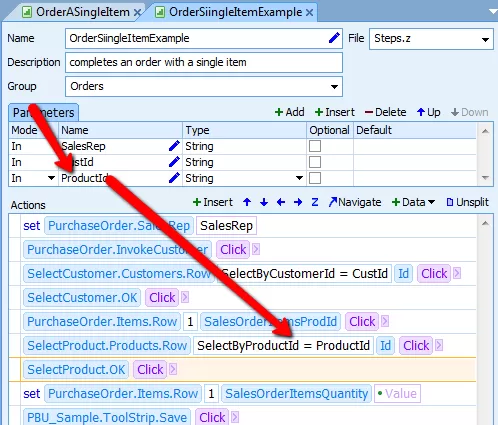
- The next step will complete a single item order. The completed step is displayed here. We’ll take it action by action below.
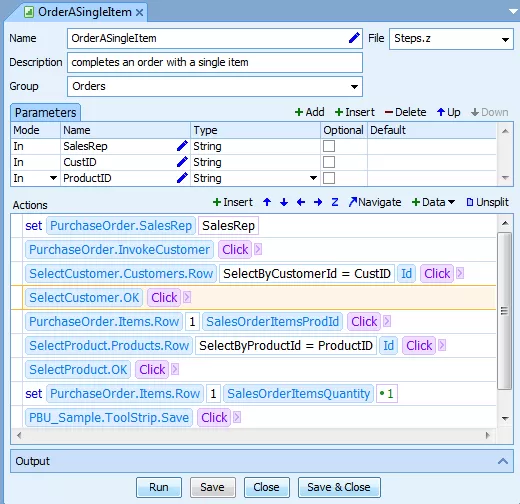
- The first action selects the Sale Representative:
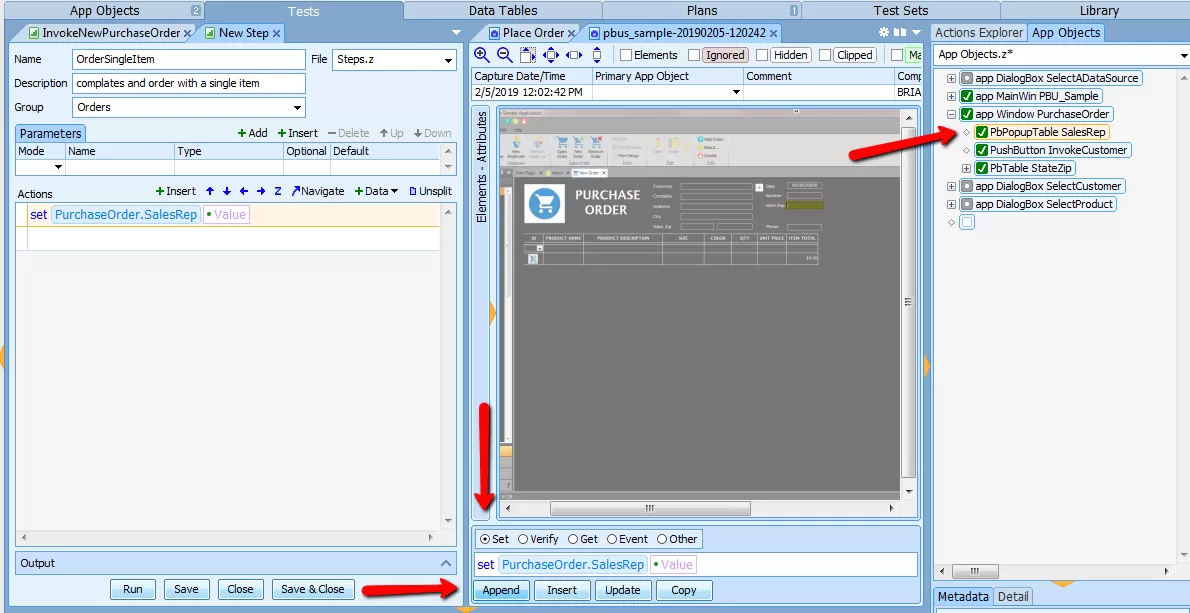
- Select the Sales Rep field in the AppObject tree.
- Select the ‘Set’ radio button in the ‘Actions Panel’ below the snapshot.
- Click the ‘Append’ button.
- The new action displays in the Step located on the left.
- The next action clicks on the ‘Invoke Customer’ button:

- Select the InvokeCustomer button in the AppObject tree.
- Select the ‘Event’ radio button in the ‘Actions Panel’ below the snapshot.
- Select ‘Click’ from the dropdown if it is not already selected.
- Click the ‘Append’ button.
- The new action displays in the Step located on the left.
- The next action selects a row in the Customers table:
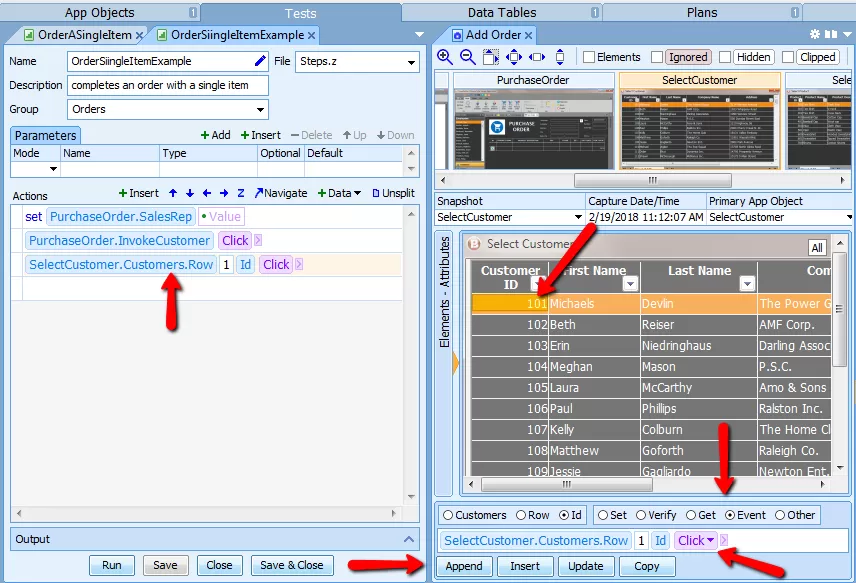
- Select the CustomerID field in the first row of the table in the snapshot.
- Select the ‘Event’ radio button in the ‘Actions Panel’ and select the ‘Click’ action.
- Click ‘Append’ and the new action displays in the Step located on the left.
- The next action clicks on the ‘OK’ button of the Customers dialog:
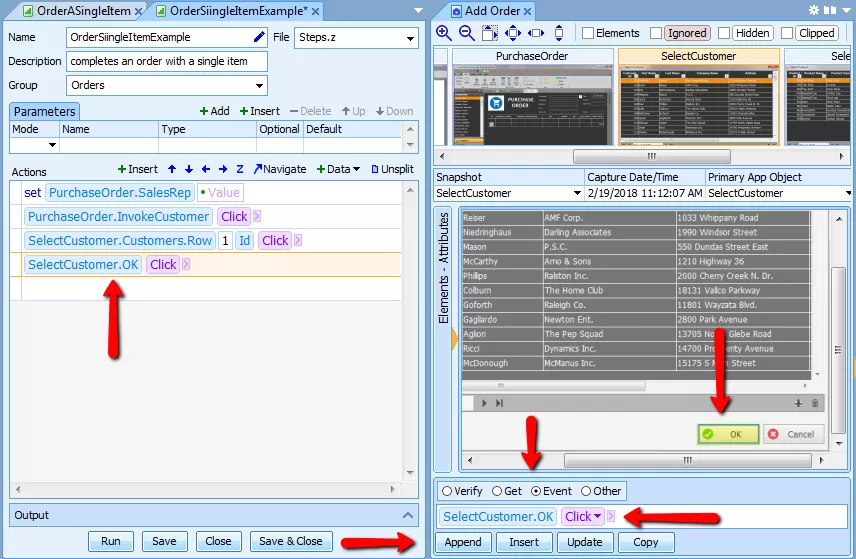
- Select the OK button in the snapshot.
- Select the ‘Event’ radio button in the ‘Actions Panel’ and select the ‘Click’ action.
- Click ‘Append’ and the new action displays in the Step located on the left.
- The next action selects a row in the Purchase Order:
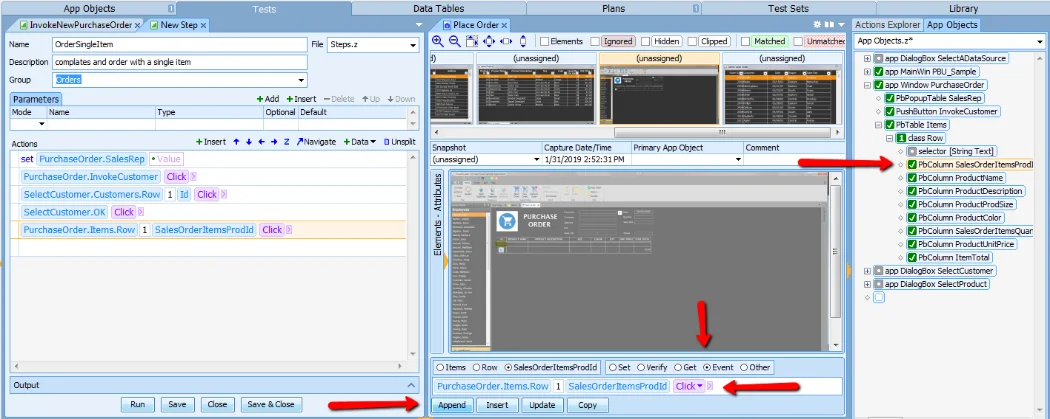
- Select the ‘SalesOrderItemsProdId’ field in the in the AppObjects tree.
- Select the ‘Event’ radio button in the ‘Actions Panel’ and select the ‘Click’ action.
- Click ‘Append’ and the new action displays in the Step located on the left.
- The next action selects a item in the ‘SelectProduct’ dialog:
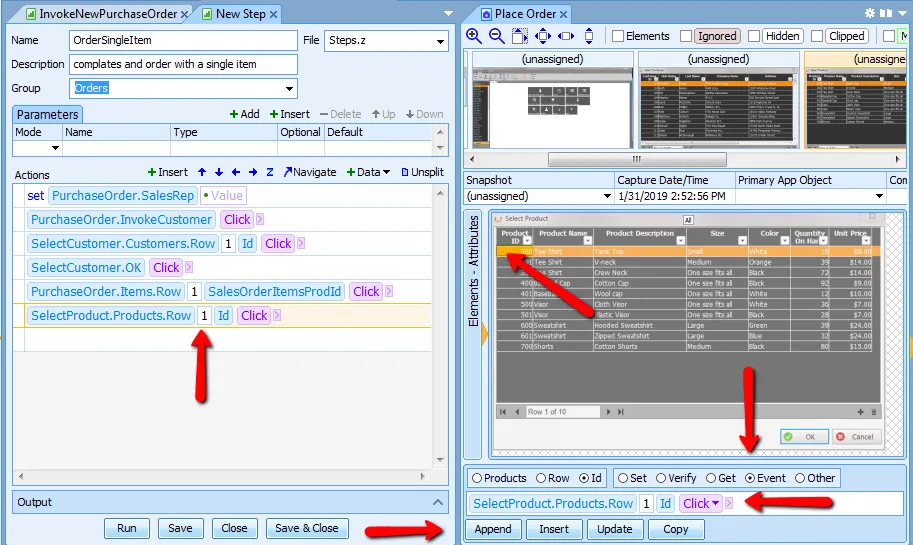
- Select the ItemID field in the first row of the table in the snapshot.
- Select the ‘Event’ radio button in the ‘Actions Panel’ and select the ‘Click’ action.
- Click ‘Append’ and the new action displays in the Step located on the left.
- The next action clicks the ‘OK’ button in the ‘SelectProduct’ dialog:
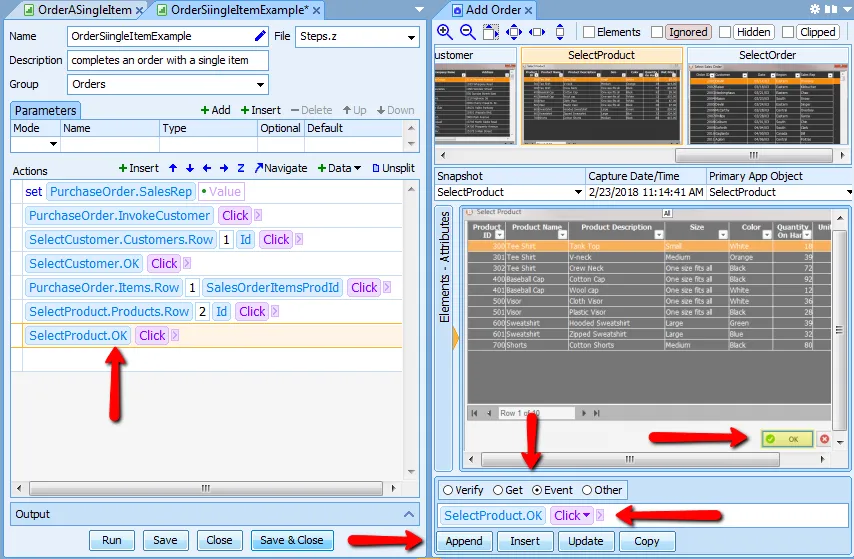
- Select the OK button in the snapshot.
- Select the ‘Event’ radio button in the ‘Actions Panel’ below the snapshot.
- Click the ‘Append’ button.
- The new action displays in the Step located on the left.
- The next action sets the Quantity field for the item:
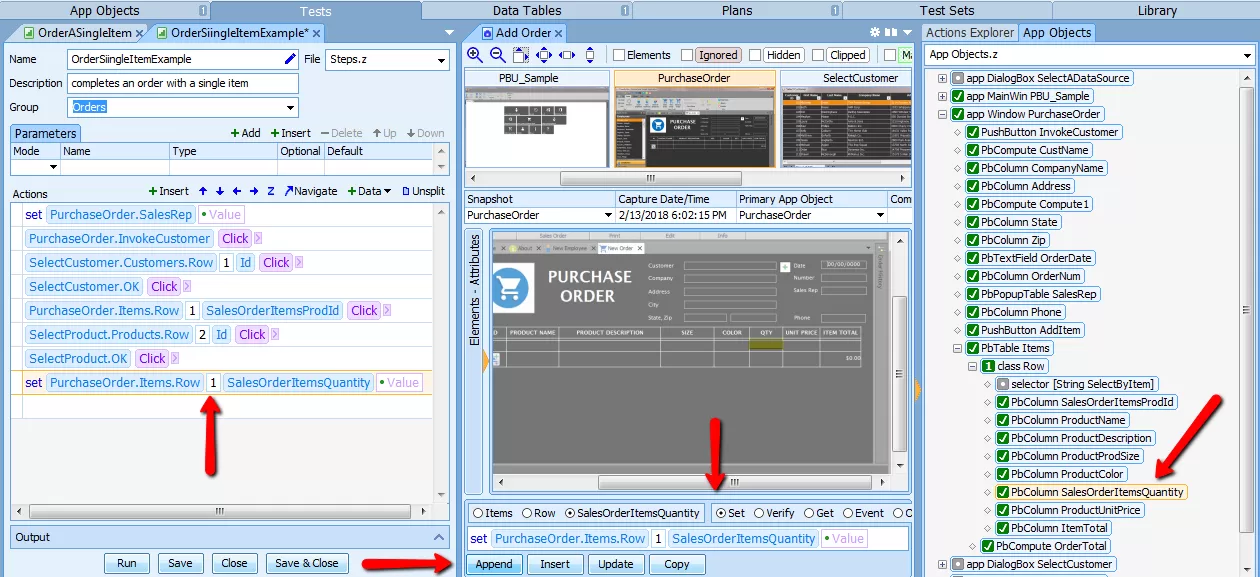
- Select the Purchase Order snapshot from the series and select the ‘SelectOrderItemQuantity’ field in the App Objects tree.
- Select the ‘Set’ radio button in the ‘Actions Panel’ below the snapshot.
- Click the ‘Append’ button.
- The new action displays in the Step located on the left.
- The last action clicks on the ‘Save’ button:
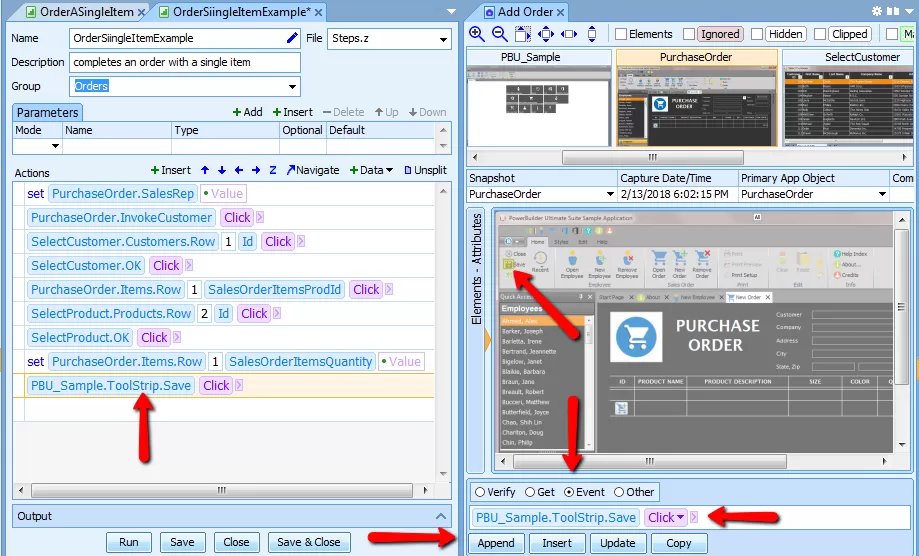
- Select the Save button in the snapshot.
- Select the ‘Event’ radio button in the ‘Actions Panel’ below the snapshot.
- Click the ‘Append’ button.
- The new action displays in the Step located on the left.
- To make the step re-usable, we need to add parameters and selector values:
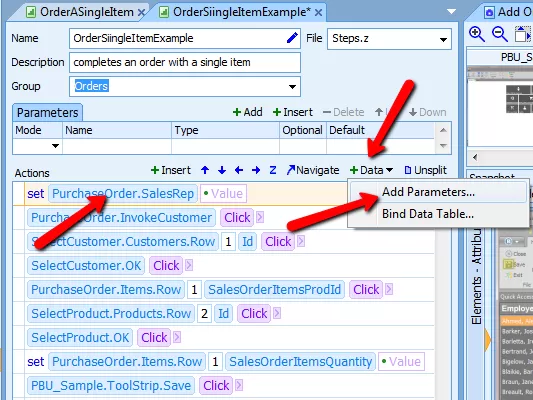
- Select the first line in the step.
- Click on the
 button.
- Select ‘Add Parameters.
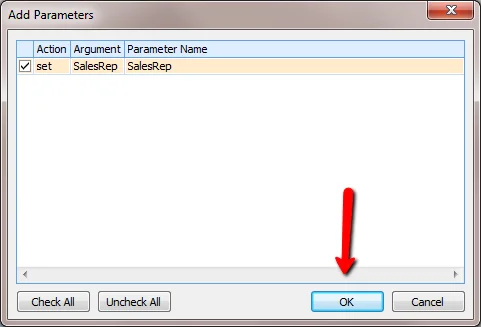
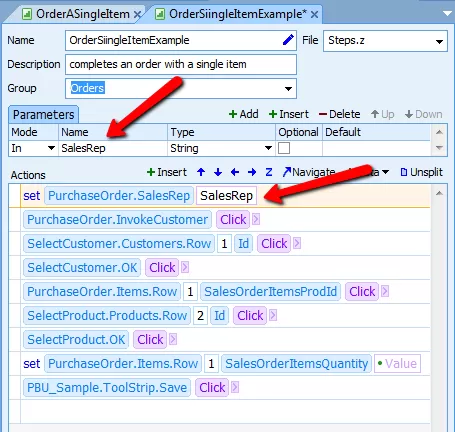
- Click ‘OK’. The new parameter is added to the step:
- Click the
 button above the Parameters table.
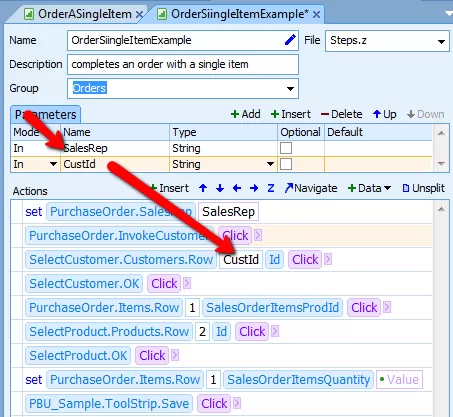
- Input the name “CustId’ into the new parameter line.
- Drag it to the selector value on line three of your step.
- Although it is not required, it is good practice to modify that line to look like this:

so that your ‘named’ selector is being used.
- Now follow the same procedure for the ProductId
- Add a quanitity value for the last action in your step:

- The step is now complete.
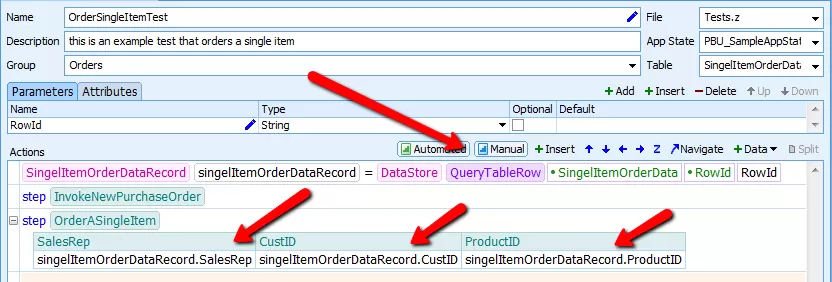
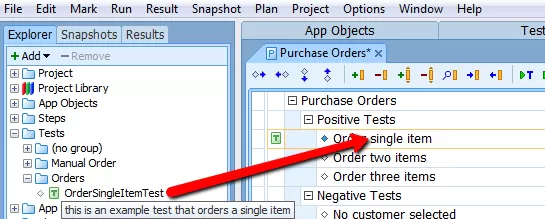
Build the Test
The process of building tests in AscentialTest is quick and easy. Tests are formed by dragging steps together in sequences and then providing the test data.
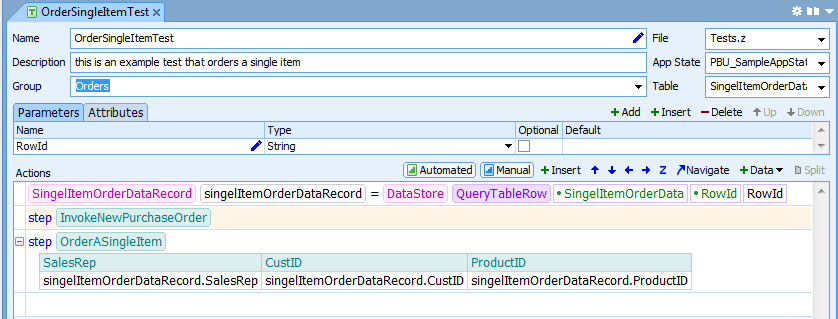
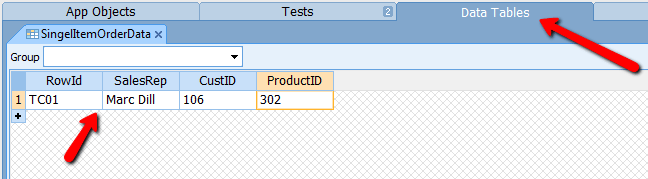
The image above displays a test comprised of two reusable steps that were dragged from the Project Explorer. The data objects were automatically generated from Step parameters. The fields in these data objects were used to generate a data table to store the test data. This test has been bound to a data table.
To create a test:
- Right-click on the on ‘Tests’ in the Project Explorer to add a new test.

- Complete the header information at the top of the test including Name, Description and Group. Select your app from the ‘App State’ dropdown if it is not already displayed.

- Drag steps from the ‘Steps’ section of the Project Explorer into the Test Editor. You can reorder them by using the Up and Down Arrow icons in the tool bar.

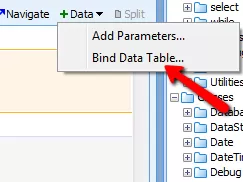
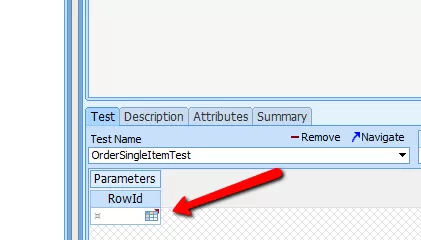
- Click on the ‘OrderASingleItem’ step and select ‘Bind Data Table’ from the Data button on the tool bar.
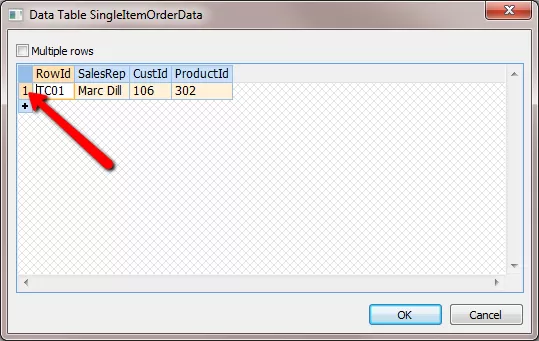
- Provide a name for the Data Table.
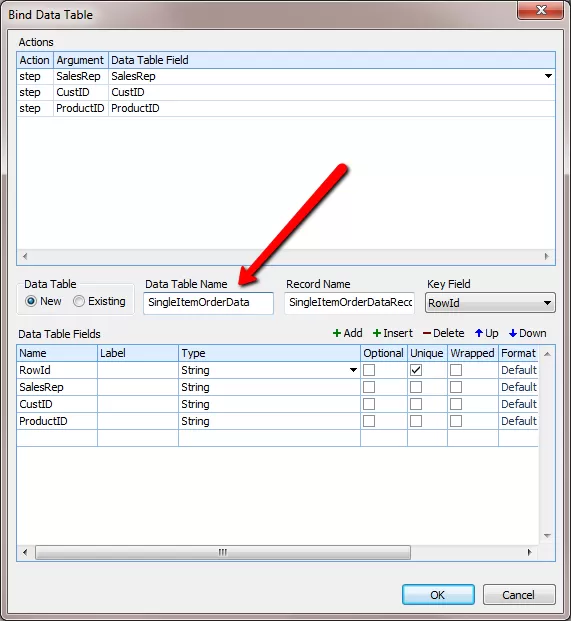
- Input the test data.
- Examine your test and notice how it was modified by AscentialTest. A table query was added and each of the parameter fields was associated with a column in the newly generated data table:
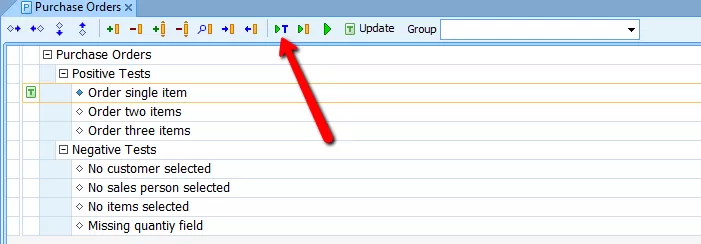
- You can use the ‘Run’ button at the bottom of the Test Editor to run your test.
- Close the target application.
- Click on the
 button.
- You will be prompted for the ‘RowId’ that you input into your data table.
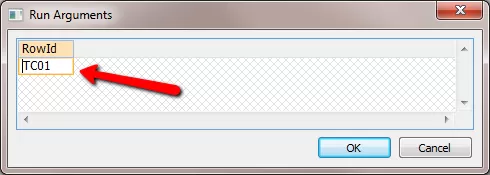
- Your test should run to completion.
Organize Tests
AscentialTest provides several layers of organization for managing your tests. To get an understanding of how tests are organized in AscentialTest, a few definitions are needed:
- A Test Plan is a container for tests.
- A Test Suite provides a way to group multiple plans together.
- A Test Set is comprised of Test Plans and Test Suites. It is used when you are ready to track and report on the results of your tests.
Test plans and suites provide ways to group and organize tests for execution. When tests are run directly from a plan or suite, results are presented in a results viewer with ‘Summary’ and ‘Output’ tabs. Users typically run tests in this way in the development phase of test automation.
Test Sets provide test execution management and reporting to support your software testing cycles and releases. A Test Set may be created for a build, a test cycle or a project, depending upon how your organization tests and delivers software.
You created a test plan earlier in this tutorial. We’ll hook the test that you just created up with that test plan and then we will create a test set.
To associate a test with a test plan:
- Open your Test Plan:
- Drag your Test to the Test Plan
- Use the Table icon
 in the lower ‘Test’ tab to select a data row in the data table:
- Double click on the row header of the first row in the data table to select the row:
- Select the Test in the Test Plan and click the
 icon (make sure AscentialTest is not covering the ‘New Order’ button where the test begins:
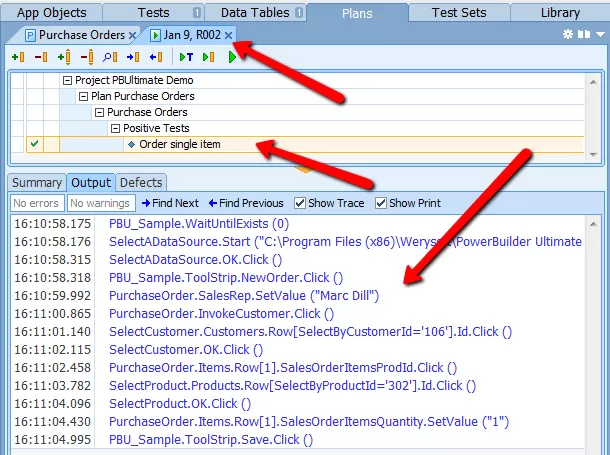
- When the test complete, the results file will be displayed. Select the line with the
 icon and then select the ‘Output’ tab in the lower part of the Results File. The trace of the test is displayed:
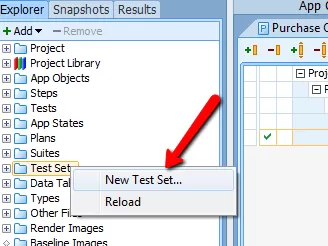
- Create a Test Set:
- Right-click on Test Sets and select ‘New Test Set’:
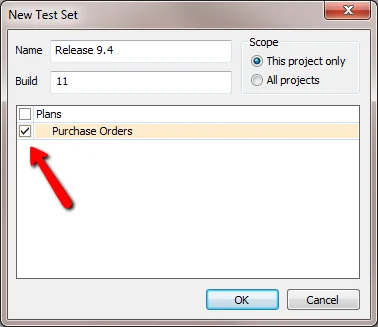
- Provide a name for the Test Set, optionally provide a Build Number and then select your Test Plan:
- The Test Set is created in the database:
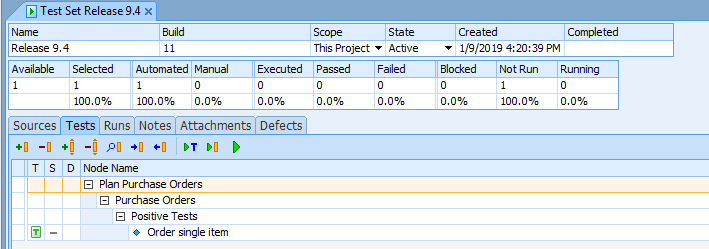
- Test Sets provide a rich feature set that allow you to manage the test execution process. You are encouraged to use AscentialTest Help to learn how to use all of the Test Set features including Test Attributes, Defect Tracking integration, Email Report Distribution, Notes and Attachments. This tutorial cover running and reporting of Test Sets in the next section.
Run Tests from Test Sets
As you learned earlier in this tutorial, you can run tests directly from Test Plans, but when you are ready to store and report upon the results of your tests, you will want to run from a Test Set.
The marking bar and tool bar are available for selecting tests to run. You might also want to familiarize yourself with the ‘Mark by Query’ mechanism to locate tests based on their attributes. Please see the Help for details.
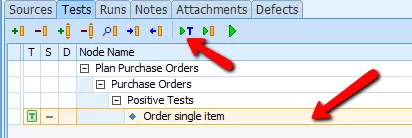
To run a single test, select the Test and then click on the  icon:
icon:
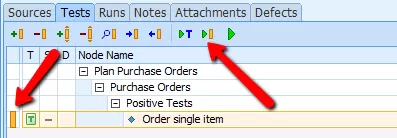
To run more than one test, use the marking bar to select you test(s) and then click on the  icon:
icon:
Report Test Results
AscentialTest provides several options for generating, publishing and distributing reports. You can select from a set of pre-defined reports and charts or create your own custom reports. Standard reports can be generated from AscentialTest or from a browser based portal (Enterprise Edition). Reports run from AscentialTest can be exported into many popular formats including PDF, HTML, EXCEL, RTF, TXT or TIF.
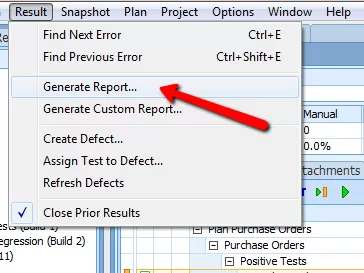
To generate a report in AscentialTest, select ‘Generate Report’ from the Results menu:
To generate a general report, select a report and click ‘OK’:
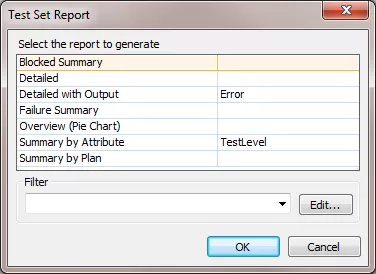
The report generator will display and then present the report. There are many other features to learning about metrics and reporting that are beyond the scope of this tutorial. Please see the AscentialTest Help for details.
For more details on the topics covered in this document, please download the AscentialTest Evaluation Guide which is a set of video tutorials. You will have received a download link along with your evaluation license file.
AscentialTest is a feature rich, comprehensive testing solution. We’ve only scratched the surface here. Now that you understand the basics, you can explore further by accessing the product Help and our YouTube channel:
https://www.youtube.com/channel/UClcqvFIa0GMn7wYLkr31Lzg/videos?sort=dd&view=0&shelf_id=0
Please contact us at [email protected] if you have any questions during your evaluation.


 Brian has been working in the field of test automation for more than 30 years. Brian began as a QA Engineer using the testing tools available in the early 1980’s. He joined Segue Software in its infancy and served as the EVP of R&D during that company’s golden years. Brian formed Star Quality, a consulting firm specializing in test automation in the late 90s. After 12 years of experience in the trenches, he’s excited to be building the next generation testing tool that will increase the productivity and and effectiveness of test and development teams.
 Dave is a pioneer in the field of automated testing. Dave developed ATF, one of the first automation tools, more than 20 yeas ago. He was a founder and Chief Architect of Segue Software, Inc., the original creators of QA Partner/SilkTest. Dave believes that no testing tool can be easy to use without a solid foundation. That’s why he is committed to providing AscentialTest’s universal agent with the most powerful object recognition engine in the industry.